azure
This article discusses what exactly an Azure Data Explorer is and its important features. We will also walk through the Kusto query language and explore a sample data in the Data Explorer in Azure.
本文讨论了什么是Azure Data Explorer以及它的重要功能。 我们还将逐步介绍Kusto查询语言,并在Azure的数据资源管理器中探索示例数据。
Companies are generating and storing truckloads of data on a daily basis. This data can be unstructured (like audios, videos), semi-structured (like XML, JSON) or structured (like numbers, dates, strings). Data professionals are incessantly looking for effective techniques to handle massive volumes of diverse data. While we can certainly do this with traditional data warehouses, Hadoop, Spark, etc. analytics tools, but that would involve the conventional approach of ETL on terabytes and petabytes of data before you can explore and analyze it.
公司每天都在生成和存储大量数据。 这些数据可以是非结构化的(例如音频,视频),半结构化的(例如XML,JSON)或结构化的(例如数字,日期,字符串)。 数据专业人员一直在寻找有效的技术来处理大量不同数据。 虽然我们当然可以使用传统的数据仓库,Hadoop,Spark等分析工具来做到这一点,但是在探索和分析数据之前,这将涉及对TB级和PB级数据进行ETL的常规方法。
A platform that would let users utilize and analyze varied raw data quickly with fast data ingestion and optimal performance will be the need of the moment. Let’s address this scenario using an interesting data analytic service.
迫切需要一个平台,该平台将使用户能够快速利用和分析各种原始数据,并快速提取数据并获得佳性能。 让我们使用一个有趣的数据分析服务解决这种情况。
什么是Azure Data Explorer? (What is Azure Data Explorer?)
Azure Data Explorer aka ADX, is a fast, highly scalable and fully managed data analytics service for log, telemetry and streaming data. This data exploration service enables you to pull together, store and analyze diverse data. You can query terabytes of data in a few seconds and it allows fast ad-hoc queries over the varied data.
Azure数据浏览器又名ADX,是一种用于日志,遥测和流数据的快速,高度可扩展和完全托管的数据分析服务。 通过此数据浏览服务,您可以汇总,存储和分析各种数据。 您可以在几秒钟内查询数TB的数据,它允许对各种数据进行快速的即席查询。
Previously known as ‘codenamed Kusto’, this tool uses SQL-like query language, Kusto query language (KQL) for analyzing fast-flowing data from IoT devices, applications, websites, etc. KQL is not limited to using functions and hundreds of operators such as aggregation, filtering, etc. but it also includes built-in machine learning features like clustering, regression, etc. We will learn more about it later in the article.
该工具以前称为“代号为Kusto”,使用类似SQL的查询语言, Kusto查询语言 (KQL)来分析来自IoT设备,应用程序,网站等的快速流动数据。KQL不限于使用功能和数百个运算符例如聚合,过滤等,但它还包含内置的机器学习功能,例如聚类,回归等。我们将在本文后面的内容中对此进行详细了解。
ADX works on the principle of isolation between Compute and Storage using volatile SSD storage as a cache and persistent storage in Azure Blob Storage. It is a fully managed ‘Platform as a Service (PaaS)’ that lets users focus only on their data and queries. To name one of the key benefits of ADX, this offering supports time series analysis with great ease and a huge list of functions to analyze, identify trends and anomalies.
ADX使用易失性SSD存储作为缓存和Azure Blob存储中的持久存储,根据计算和存储之间的隔离原理进行工作。 它是完全托管的“平台即服务(PaaS)”,使用户仅关注其数据和查询。 为了说明ADX的主要优势之一,该产品支持使用以下工具进行时间序列分析: 非常方便,并提供大量功能来分析,识别趋势和异常。
We assume you are familiar with Azure and have an Azure subscription. In case, you don’t, please go ahead and follow the steps here to create one for yourself.
我们假定您熟悉Azure并具有Azure订阅。 在情况下,你没有,请继续,然后按照步骤在这里创建一个自己。
Azure数据资源管理器如何工作? (How does Azure Data Explorer work?)
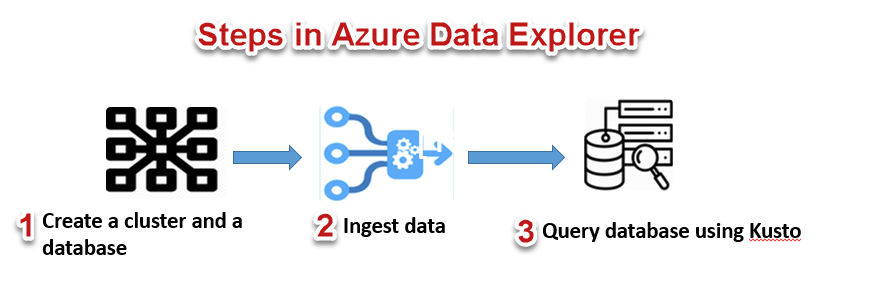
We can start by first creating a cluster and one or more databases in it. Then we need to load (ingest) data into a database we just created and finally you can run queries against it and perform data exploration.
首先,我们可以创建一个集群以及其中的一个或多个数据库。 然后,我们需要将数据加载(摄取)到刚创建的数据库中,后您可以对它运行查询并执行数据浏览。
Let’s get into the concepts of ADX and see how it unfolds.
让我们进入ADX的概念,看看它如何发展。
如何创建Azure Data Explorer群集? (How to create an Azure Data Explorer cluster?)
Creating a cluster is a straight-directional process as you would do for any other Azure resource, sign-in to Azure Portal, and search for ‘Azure Data Explorer cluster’ and click on Create.
创建群集是一个直接的过程,就像处理任何其他Azure资源一样,登录到Azure Portal并搜索“ Azure Data Explorer群集”,然后单击“创建”。
Provide in basic details like your subscription, Resource group (you can create a new one too), your ADX cluster name, pricing details, etc. For demo purposes, I have selected the lowest price specification, development tier (Dev D11) and be mindful of not using this in production environments. Click ‘Review + create’ to review cluster details and finally provision a cluster.
提供基本详细信息,例如您的订阅,资源组(您也可以创建一个新的),您的ADX群集名称,定价详细信息等。出于演示目的,我选择了低的价格规格,开发层(Dev D11),注意不要在生产环境中使用此功能。 单击“审阅+创建”以审阅集群详细信息,后设置集群。
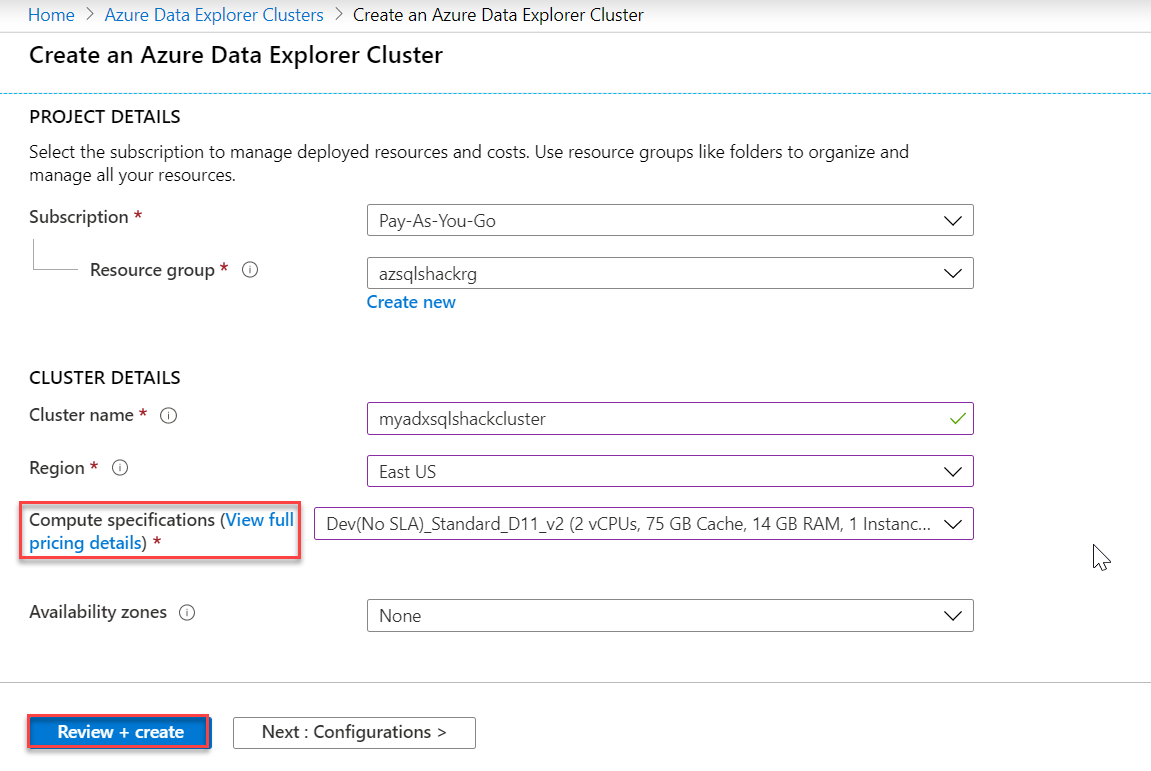
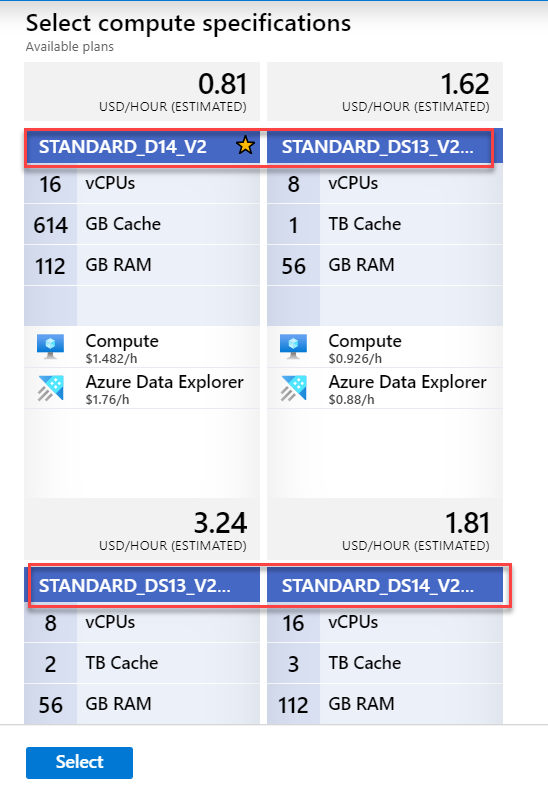
Also, you can click on ‘View full pricing details’ to get detailed information on pricing. ADX clusters are billed on a per-minute basis and they are charged only when they are running. Also, if you notice below, ADX supports two * of instances – D series (Compute-optimized instances – for a large number of queries on small data) and DS series (Storage optimized instances – for fewer queries on a huge volume of data). Select them depending on your workload needs.
另外,您可以单击“查看完整的定价详细信息”以获取有关定价的详细信息。 ADX群集按分钟计费,并且仅在运行时才收费。 另外,如果您在下面注意到,则ADX支持两种类型的实例– D系列(计算优化的实例–用于对小数据的大量查询)和DS系列(存储优化的实例–用于对大量数据的较少查询) 。 根据您的工作负载需求选择它们。
You can understand more about ADX cost estimation using this ADX Cost Estimator.
您可以使用此ADX Cost Estimator进一步了解ADX成本估算 。
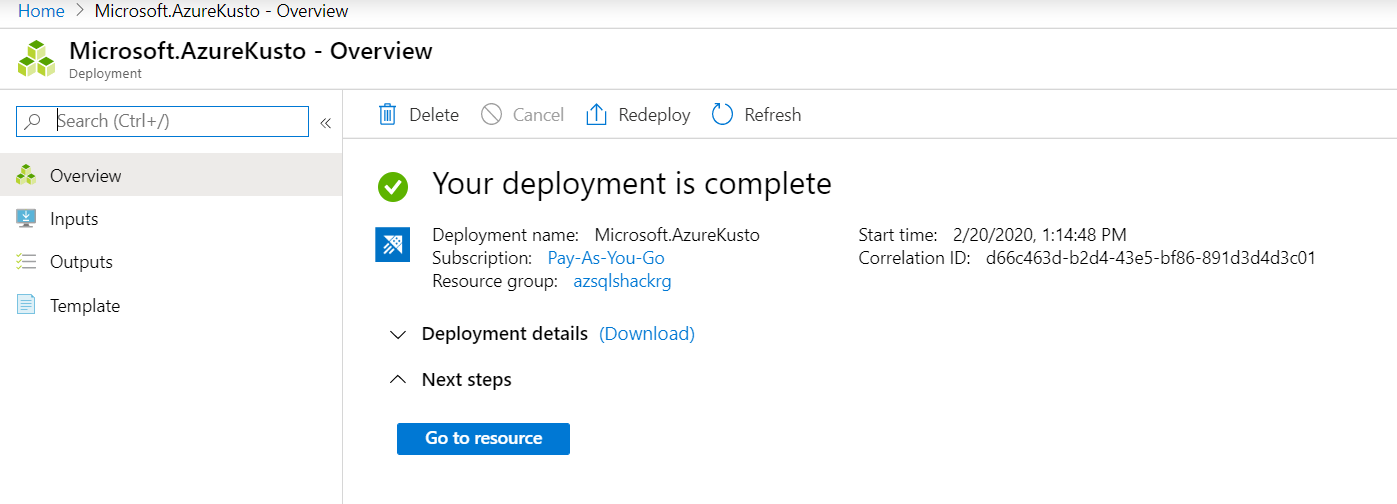
Once created, you will be notified as shown in the following snapshot. Click on the ‘Go to resource’ button.
创建后,将如以下快照中所示通知您。 点击“转到资源”按钮。
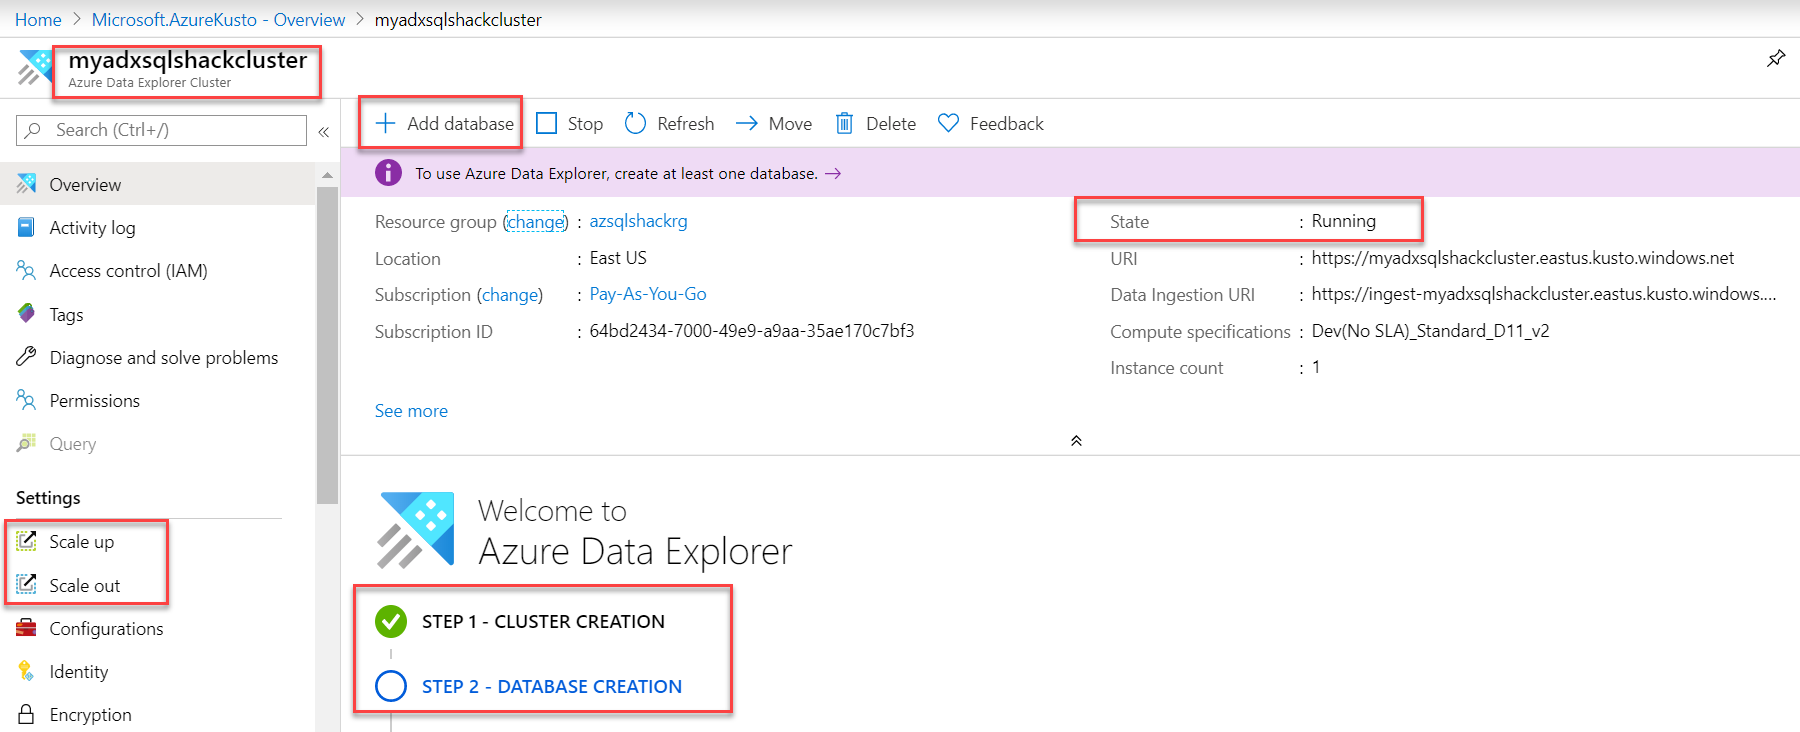
And you can see, Step 1 – cluster, myadxsqlshackcluster is created successfully and is running. You can also scale up and scale out based on your business needs. Let’s head over to step 2 of database creation and click on Add database.
您会看到,步骤1 –集群,myadxsqlshackcluster已成功创建并正在运行。 您还可以根据业务需求进行扩展和扩展。 让我们进入数据库创建的第2步,然后点击添加数据库 。
在集群中创建数据库 (Create a database in the cluster)
Fill in the following information like the name of the database, retention and cache period in days and hit the Create button. This is a unique feature of ADX that lets you decide for how long you want to keep the data in the cache (hot or cold). I am providing a minimum number of days for the purpose of this demo.
填写以下信息,例如数据库名称,保留和缓存期限(以天为单位),然后单击“创建”按钮。 这是ADX的独特功能,可让您决定将数据保留在缓存中的时间(热或冷)。 我为此演示提供了少的天数。
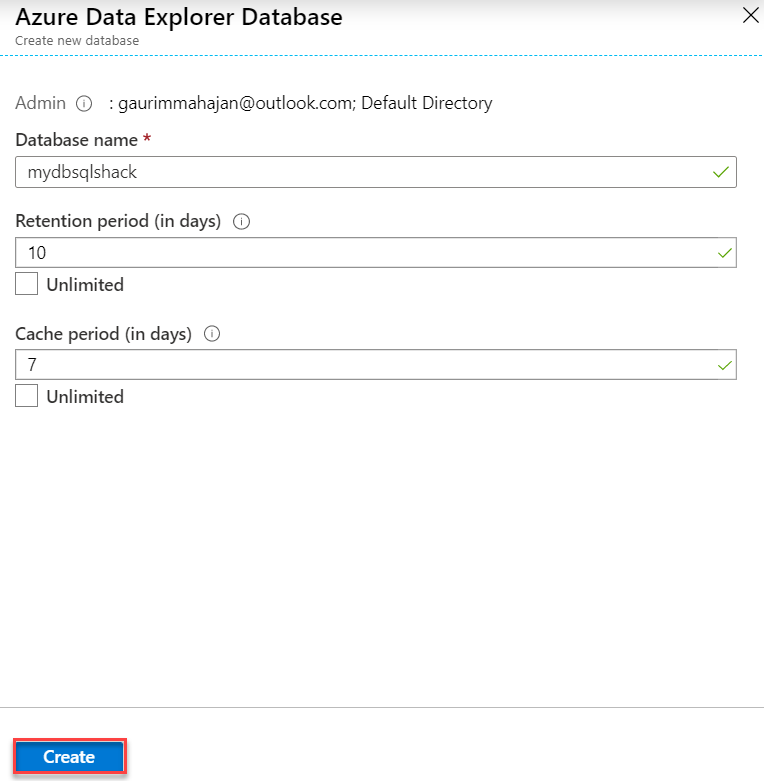
The database, mydbsqlshack, is created in the cluster.
数据库mydbsqlshack在群集中创建。

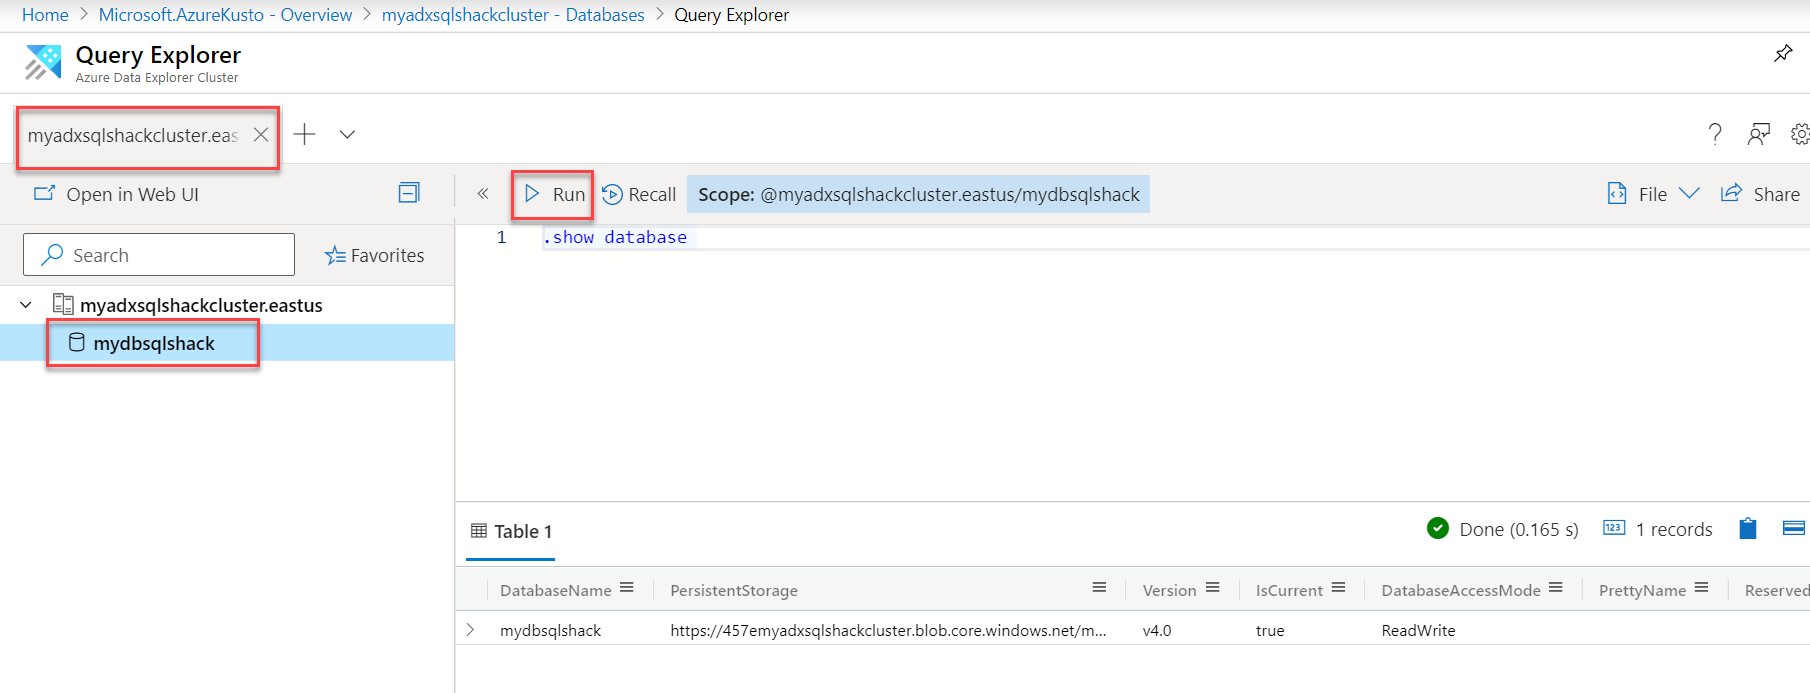
Now that our cluster and database are in place, you can go into the database and run a simple command like “.show database” that would return details of your database.
现在我们的集群和数据库已经就绪,您可以进入数据库并运行一个简单的命令,例如“ .show database”,它将返回数据库的详细信息。
数据浏览器Web UI (Data Explorer Web UI)
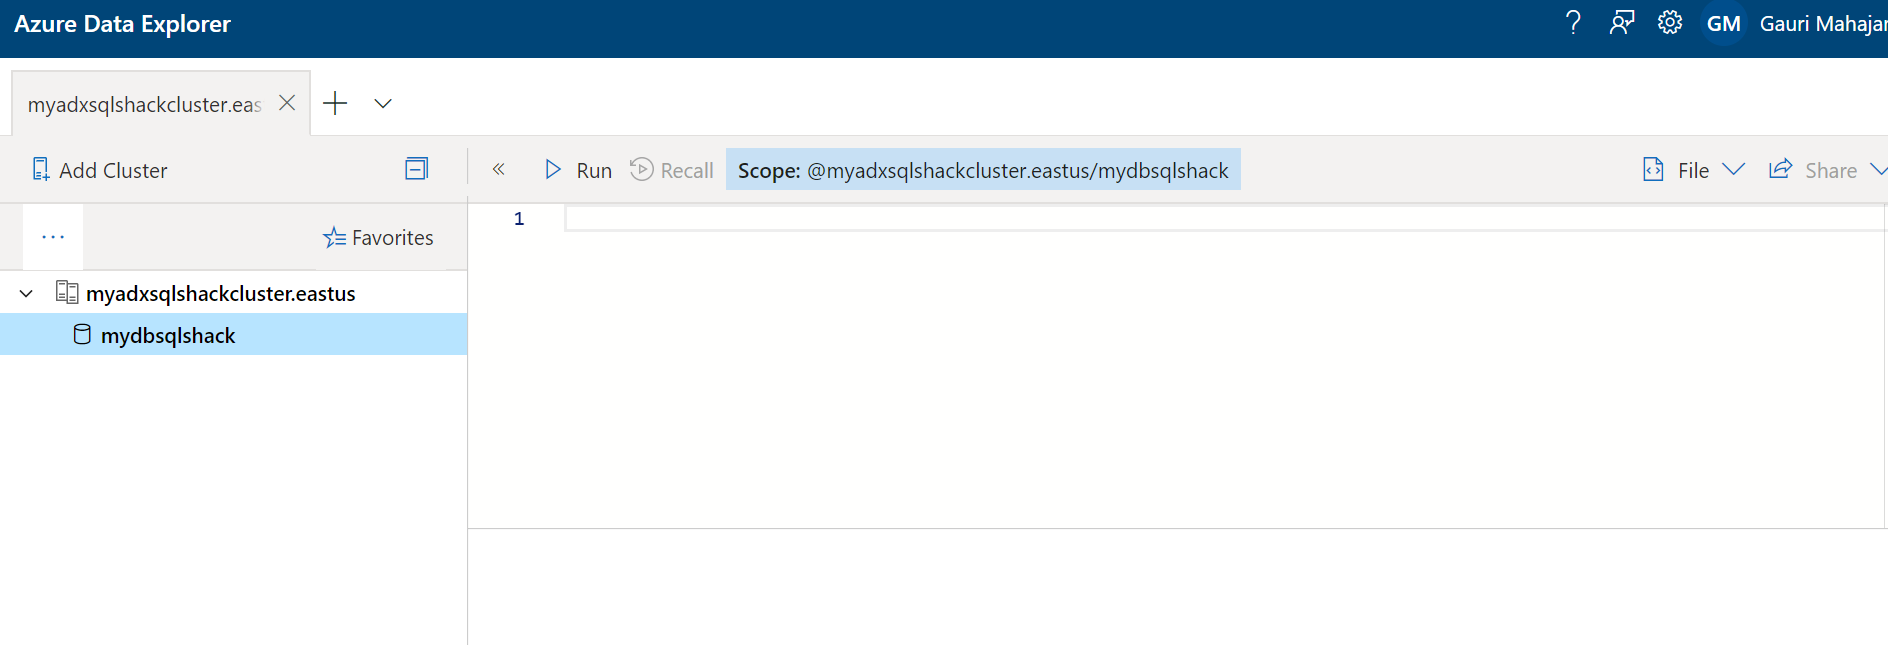
You can use the Azure web application also for the same.
您也可以使用Azure Web应用程序 。
Ingesting a sample data into Azure Data Explorer
After the database is created successfully, we need to work on step 3 – Data ingestion. You can click on Create data connection to load/ingest data from Event Hub, Blob Storage or IoT Hub into the database you just created. ADX also supports a wide variety of other methods to ingest data such as using Kafka connector, Azure Data Factory, Event Hub, etc. and this indeed is another discussion outside the scope of this article. You can go over these various ways to ingest large volumes of data, here.
成功创建数据库后,我们需要进行步骤3 –数据提取。 您可以单击创建数据连接以将事件中心,Blob存储或IoT中心中的数据加载/导入到刚创建的数据库中。 ADX还支持多种其他方法来提取数据,例如使用Kafka连接器,Azure数据工厂,事件中心等,这确实是本文讨论之外的另一项讨论。 您可以在此处查看这些各种方法来摄取大量数据。
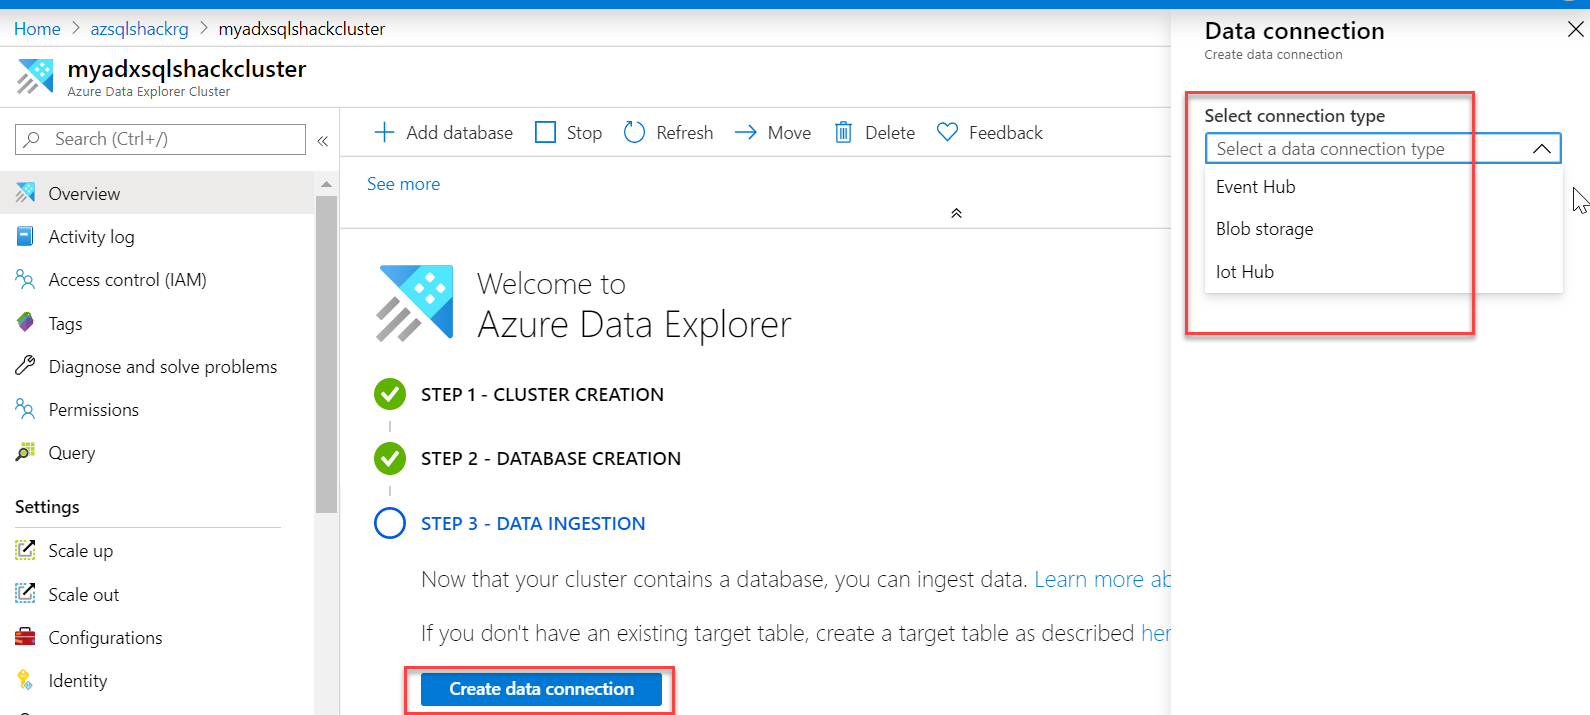
For this article, we will demonstrate a basic example where we load sample data from Azure Blob Storage into the ADX database.
对于本文,我们将演示一个基本示例,该示例将Azure Blob存储中的示例数据加载到ADX数据库中。
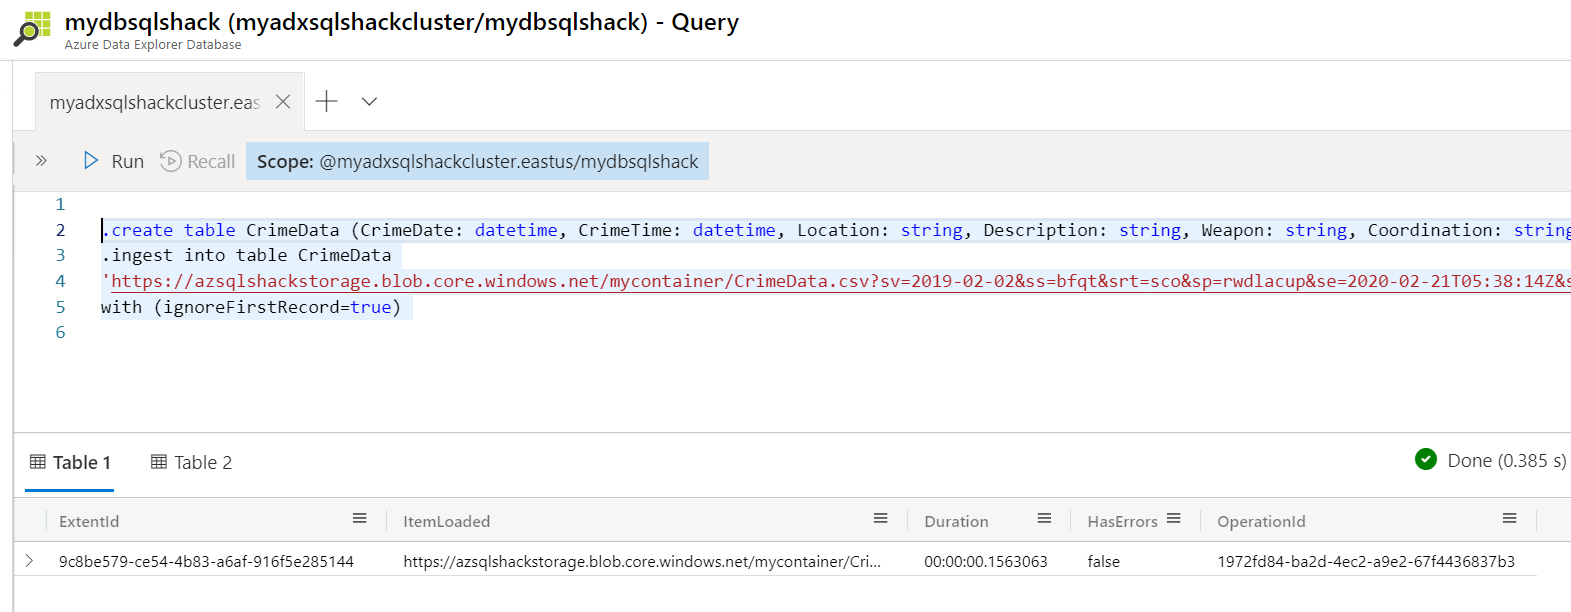
Paste the below commands in the query explorer. The first command creates a table CrimeData and the second command ingests data from the csv file to this table. The source csv (CrimeData.csv) resides in a container named mycontainer in the Azure Blob Container.
将以下命令粘贴到查询资源管理器中。 个命令创建一个表CrimeData,第二个命令将数据从csv文件提取到该表。 源csv(CrimeData.csv)驻留在Azure Blob容器中名为mycontainer的容器中。
.create table CrimeData (CrimeDate: datetime, CrimeTime: datetime, Location: string, Description: string, Weapon: string, Coordination: string)
.create表CrimeData(CrimeDate:datetime,CrimeTime:datetime,Location:字符串,Description:字符串,Weapon:字符串,Coordination:字符串)
.ingest into table CrimeData
‘https://azsqlshackstorage.blob.core.windows.net/mycontainer/CrimeData.csv?sv=2019-02-02&ss=bfqt&srt=sco&sp=rwdlacup&se=2020-02-21T05:38:14Z&st=2020-02-20T21:38:14Z&spr=https&sig=adoJ%2BM494Vq6lwCvL0ZjWP%2BtaZsTNMcPtnIh%2BuPBlQw%3D’ with (ignoreFirstRecord=true)
.ingest到表CrimeData中
'https://azsqlshackstorage.blob.core.windows.net/mycontainer/CrimeData.csv?sv=2019-02-02&ss=bfqt&srt=sco&sp=rwdlacup&se=2020-02-21T05:38:14Z&st=2020-02-20T21 :38:14Z&spr = https&sig = adoJ%2BM494Vq6lwCvL0ZjWP%2BtaZsTNMcPtnIh%2BuPBlQw%3D'与(ignoreFirstRecord = true)
使用Kusto语言查询数据库 (Query the database using Kusto language)
Once the ingestion is done, your database is ready for data exploration. We use Kusto query language in Azure Data Explorer to run queries. You are right if you think Log queries in Azure Log Analytics and Azure Monitor also use the same language, KQL. Being a SQL person, I find this document extremely handy for SQL to Kusto query translations.
提取完成后,您的数据库就可以进行数据浏览了。 我们在Azure数据资源管理器中使用Kusto查询语言来运行查询。 如果您认为Azure Log Analytics和Azure Monitor中的日志查询也使用相同的语言KQL,那您是对的。 作为一名SQL专家,我发现此文档非常适合从SQL到Kusto的查询翻译。
Let’s begin by querying our database to show 10 rows from the CrimeData table. To do so, paste this in the query window and hit Run. The following screenshot shows the result.
让我们首先查询数据库以显示CrimeData表中的10行。 为此,请将其粘贴到查询窗口中,然后单击“运行”。 以下屏幕截图显示了结果。
CrimeData
犯罪数据
|take 10
|取10
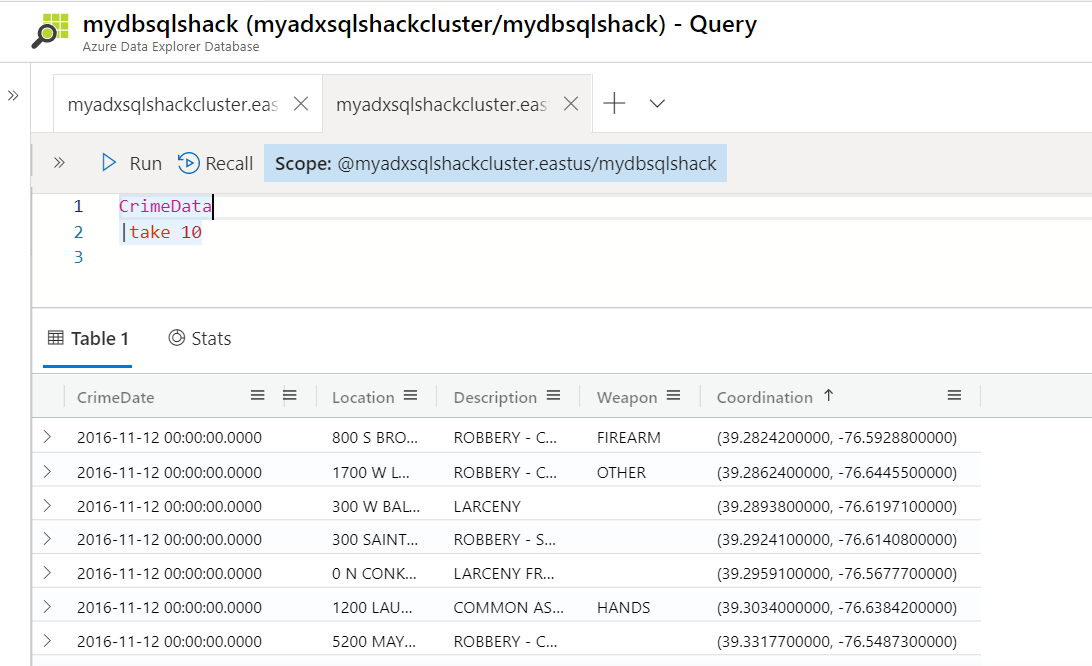
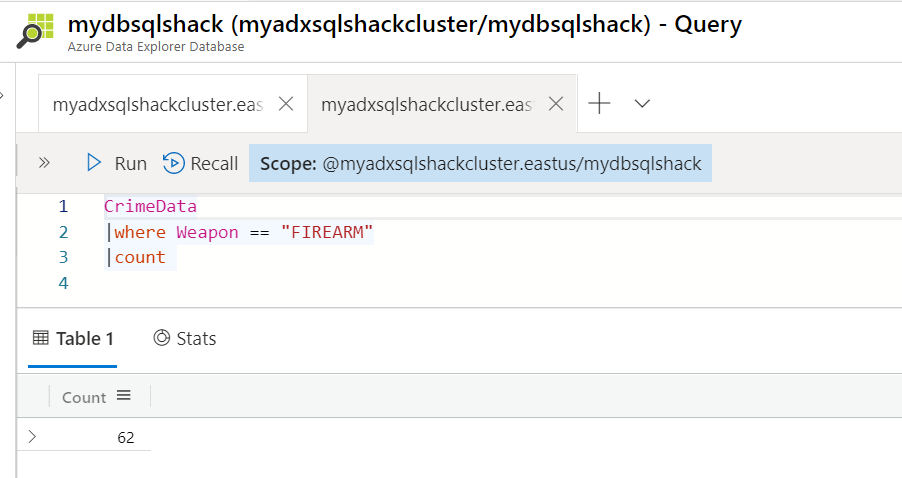
Let’s try a new query that retrieves the count of records with Weapon equals to Firearm.
让我们尝试一个新查询,该查询使用“武器”等于“火器”来检索记录数。
CrimeData
犯罪数据
| where Weapon == “FIREARM”
| 武器==“ FIREARM”
| count
| 计数
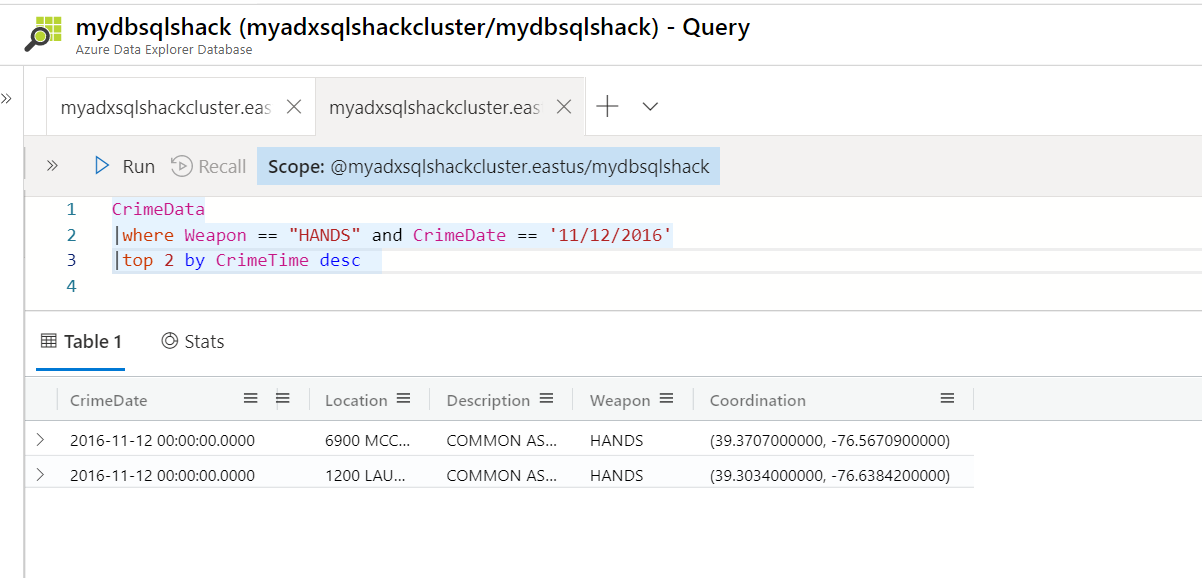
The following query returns a new output; it retrieves the top 2 rows for the crimes that happened on 11/12/2016 with weapons as Hands.
以下查询返回新的输出; 它会检索2016年12月12日发生的以手为武器的犯罪的前2行。
CrimeData
犯罪数据
|where Weapon == “HANDS” and CrimeDate == “11/12/2016”
|其中武器==“ HANDS”和CrimeDate ==“ 2016/11/12”
|top 2 by CrimeTime desc
| top 2由CrimeTime desc
We can also include tools for basic visualization and can choose from a range of chart * using render operator.
我们还可以包括用于基本可视化的工具,并可以使用渲染运算符从多种图表类型中进行选择。
Also, keep in mind, ADX does not let you delete row(s) from the table as we do in a SQL table, because of the fast read access. You can delete a table though using the drop command like this – .drop table <tablename>.
此外,请记住,由于具有快速读取访问权限,因此ADX不允许您像在SQL表中一样从表中删除行。 您可以使用以下删除命令来删除表,如–drop表<tablename>。
Microsoft has done an excellent job of putting out a wide variety of documentation on Azure Data Explorer with several step-by-step tutorials here.
Microsoft出色地完成了在Azure Data Explorer上发布各种文档的工作,并在此处提供了一些分步教程。
摘要 (Summary)
We covered introducing Azure Data Explorer in this article and learned how to create it and some of its important features. Apart from the above aspects of ADX, you can also connect ADX to Power BI to visualize data and gain powerful insights about it.
我们在本文中介绍了Azure Data Explorer的介绍,并学习了如何创建它及其一些重要功能。 除了ADX的上述方面之外,您还可以将ADX连接到Power BI,以可视化数据并获得强大的见解。
