Vcluster 是一个可以在 Kubernetes 集群中快速创建 Kubernetes 虚拟集群的实用工具。项目地址:https://github.com/loft-sh/vcluster
什么是虚拟 Kubernetes 集群?
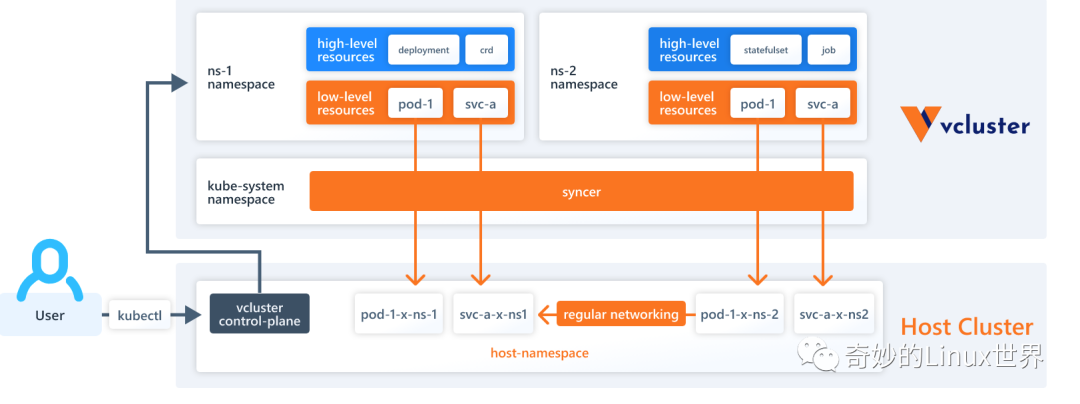
虚拟集群是运行在其它 Kubernetes 集群之上的 Kubernetes 集群。与完全独立的 "真实" 集群相比,虚拟集群没有自己的节点池。相反,它们是在底层集群内调度工作负载,同时拥有自己的控制平面。
虚拟 Kubernetes 集群的特性
轻量级和低开销
它是基于 K3S,捆绑在一个 Pod 中,具有超低的资源消耗。
无性能损耗
所有的 Pod 被调度在底层主机集群中,因此它们在运行时不会受到任何性能影响。
减少主机集群的开销
将大型多租户集群分割成较小的 Vcluster ,以减少复杂性并提高可扩展性。
灵活而简单的配置
你可以通过 Vcluster CLI、Helm、Kubectl、Argo 等任何工具来创建(它基本上只是一个 StatefulSet)。
不需要管理权限
如果你能将 Web 应用部署到 Kubernetes 命名空间,你也能部署 Vcluster。
单一命名空间封装
每个 Vcluster 及其所有的工作负载都在底层主机集群的单一命名空间内。
易于清理
删除主机命名空间,Vcluster 及其所有工作负载将立即被清除。
Vcluster 架构图

使用 Vcluster 创建 Kubernetes 虚拟集群
安装 vcluster CLI
下载并安装 vcluster CLI
vcluster CLI 是使用 Go 语言开发的,只需根据你所使用的平台下载相应软件包并将其放到相应路径即可完成安装。
Mac (Intel/AMD)
$ curl -s -L "https://github.com/loft-sh/vcluster/releases/latest" | sed -nE 's!.*"([^"]*vcluster-darwin-amd64)".*!https://github.com\1!p' | xargs -n 1 curl -L -o vcluster && chmod +x vcluster;
$ sudo mv vcluster /usr/local/bin;
Mac (Silicon/ARM)
$ curl -s -L "https://github.com/loft-sh/vcluster/releases/latest" | sed -nE 's!.*"([^"]*vcluster-darwin-arm64)".*!https://github.com\1!p' | xargs -n 1 curl -L -o vcluster && chmod +x vcluster;
$ sudo mv vcluster /usr/local/bin;
Linux (AMD)
$ curl -s -L "https://github.com/loft-sh/vcluster/releases/latest" | sed -nE 's!.*"([^"]*vcluster-linux-amd64)".*!https://github.com\1!p' | xargs -n 1 curl -L -o vcluster && chmod +x vcluster;
$ sudo mv vcluster /usr/local/bin;
Linux (ARM)
$ curl -s -L "https://github.com/loft-sh/vcluster/releases/latest" | sed -nE 's!.*"([^"]*vcluster-linux-arm64)".*!https://github.com\1!p' | xargs -n 1 curl -L -o vcluster && chmod +x vcluster;
$ sudo mv vcluster /usr/local/bin;
Windows (Powershell)
$ md -Force "$Env:APPDATA\vcluster"; [System.Net.ServicePointManager]::SecurityProtocol = [System.Net.SecurityProtocolType]'Tls,Tls11,Tls12';
$ Invoke-WebRequest -UseBasicParsing ((Invoke-WebRequest -URI "https://github.com/loft-sh/vcluster/releases/latest" -UseBasicParsing).Content -replace "(?ms).*`"([^`"]*vcluster-windows-amd64.exe)`".*","https://github.com/`$1") -o $Env:APPDATA\vcluster\vcluster.exe;
$ $env:Path += ";" + $Env:APPDATA + "\vcluster";
$ [Environment]::SetEnvironmentVariable("Path", $env:Path, [System.EnvironmentVariableTarget]::User);
如果你在安装后收到
Windows找不到Vcluster的错误,你将需要重新启动你的计算机,来应用PATH变量的修改。
确认 Vcluster CLI 已正确安装
要确认 Vcluster CLI 已成功安装,可通过以下方式进行测试:
$ vcluster --version
通过 Vcluster CLI 部署虚拟集群
通过 Vcluster CLI 创建虚拟集群非常的简单,只需一条指定便可完成。
$ vcluster create vcluster-1 -n host-namespace-1
注:在使用
Vcluster CLI前,确定你已经在本地配置好一个可以访问Kubernetes集群的环境。(可通过kubectl命令获取命名空间进行检查。)
当然如果你不想安装 Vcluster CLI,也可以通过 Helm 和 Kubectl 直接部署虚拟集群。
通过 Helm 部署虚拟集群
首先建立一个部署文件,这里命名为 vcluster.yaml:
$ cat vcluster.yaml
vcluster:
  image: rancher/k3s:v1.19.5-k3s2
  extraArgs:
    - --service-cidr=10.96.0.0/12
  baseArgs:
    - server
    - --write-kubeconfig=/k3s-config/kube-config.yaml
    - --data-dir=/data
    - --no-deploy=traefik,servicelb,metrics-server,local-storage
    - --disable-network-policy
    - --disable-agent
    - --disable-scheduler
    - --disable-cloud-controller
    - --flannel-backend=none
    - --kube-controller-manager-arg=controllers=*,-nodeipam,-nodelifecycle,-persistentvolume-binder,-attachdetach,-persistentvolume-expander,-cloud-node-lifecycle
storage:
  size: 5Gi
然后使用 Helm 完成部署。
$ helm upgrade --install vcluster-1 vcluster \
  --values vcluster.yaml \
  --repo https://charts.loft.sh \
  --namespace vcluster-1 \
  --repository-config=''
通过 Kubectl 部署虚拟集群
首先建立一个部署文件,这里命名为 vcluster.yaml:
$ cat vcluster.yaml
apiVersion: v1
kind: ServiceAccount
metadata:
  name: vcluster-1
---
kind: Role
apiVersion: rbac.authorization.k8s.io/v1
metadata:
  name: vcluster-1
rules:
  - apiGroups: [""]
    resources: ["configmaps", "secrets", "services", "services/proxy", "pods", "pods/proxy", "pods/attach", "pods/portforward", "pods/exec", "pods/log", "events", "endpoints", "persistentvolumeclaims"]
    verbs: ["*"]
  - apiGroups: ["networking.k8s.io"]
    resources: ["ingresses"]
    verbs: ["*"]
  - apiGroups: [""]
    resources: ["namespaces"]
    verbs: ["get", "list", "watch"]
  - apiGroups: ["apps"]
    resources: ["statefulsets"]
    verbs: ["get", "list", "watch"]
---
kind: RoleBinding
apiVersion: rbac.authorization.k8s.io/v1
metadata:
  name: vcluster-1
subjects:
  - kind: ServiceAccount
    name: vcluster-1
roleRef:
  kind: Role
  name: vcluster-1
  apiGroup: rbac.authorization.k8s.io
---
apiVersion: v1
kind: Service
metadata:
  name: vcluster-1
spec:
  type: ClusterIP
  ports:
    - name: https
      port: 443
      targetPort: 8443
      protocol: TCP
  selector:
    app: vcluster-1
---
apiVersion: v1
kind: Service
metadata:
  name: vcluster-1-headless
spec:
  ports:
    - name: https
      port: 443
      targetPort: 8443
      protocol: TCP
  clusterIP: None
  selector:
    app: vcluster-1
---
apiVersion: apps/v1
kind: StatefulSet
metadata:
  name: vcluster-1
  labels:
    app: vcluster-1
spec:
  serviceName: vcluster-1-headless
  replicas: 1
  selector:
    matchLabels:
      app: vcluster-1
  template:
    metadata:
      labels:
        app: vcluster-1
    spec:
      terminationGracePeriodSeconds: 10
      serviceAccountName: vcluster-1
      containers:
      - image: rancher/k3s:v1.19.5-k3s2
        name: virtual-cluster
        command:
          - "/bin/k3s"
        args:
          - "server"
          - "--write-kubeconfig=/k3s-config/kube-config.yaml"
          - "--data-dir=/data"
          - "--disable=traefik,servicelb,metrics-server,local-storage"
          - "--disable-network-policy"
          - "--disable-agent"
          - "--disable-scheduler"
          - "--disable-cloud-controller"
          - "--flannel-backend=none"
          - "--kube-controller-manager-arg=controllers=*,-nodeipam,-nodelifecycle,-persistentvolume-binder,-attachdetach,-persistentvolume-expander,-cloud-node-lifecycle"
          - "--service-cidr=10.96.0.0/12"
        volumeMounts:
          - mountPath: /data
            name: data
      - name: syncer
        image: "loftsh/virtual-cluster:0.0.27"
        args:
          - --service-name=vcluster-1
          - --suffix=vcluster-1
          - --owning-statefulset=vcluster-1
          - --out-kube-config-secret=vcluster-1
        volumeMounts:
          - mountPath: /data
            name: data
  volumeClaimTemplates:
    - metadata:
        name: data
      spec:
        accessModes: [ "ReadWriteOnce" ]
        resources:
          requests:
            storage: 5Gi
然后使用 Kubectl 命令完成部署。
$ kubectl apply -f vcluster.yaml
在使用虚拟集群前,你必须先完成端口转发和 kube-config 文件的配置。你可以通过下面的命令来完成它:
$ vcluster connect vcluster-1 -n host-namespace-1
$ export KUBECONFIG=./kubeconfig.yaml
# 或者
$ vcluster connect vcluster-1 -n host-namespace-1 --update-current
以上配置完成后,你就可以愉快的使用这个 Kubernetes 虚拟集群了,它的使用和正常的 Kubernetes 集群并无区别。
# 通过 Kubectl 管理虚拟集群
$ kubectl get namespace
$ kubectl get pods -n kube-system
$ kubectl create namespace demo-nginx
$ kubectl create deployment nginx-deployment -n demo-nginx --image=nginx
$ kubectl get pods -n demo-nginx
删除虚拟集群
通过 Vcluster CLI 删除虚拟集群同样也是非常的简单,只需一条指定便可完成。
$ vcluster delete vcluster-1 -n host-namespace-1
你也可以直接使用 kubectl 命令直接删除相应命名空间。


原文链接:https://mp.weixin.qq.com/s/-PSzsqBu3U95z_hmlWiHZg
