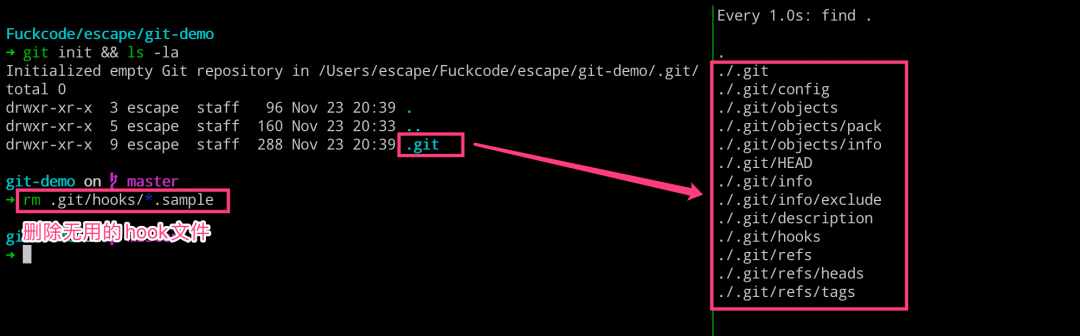
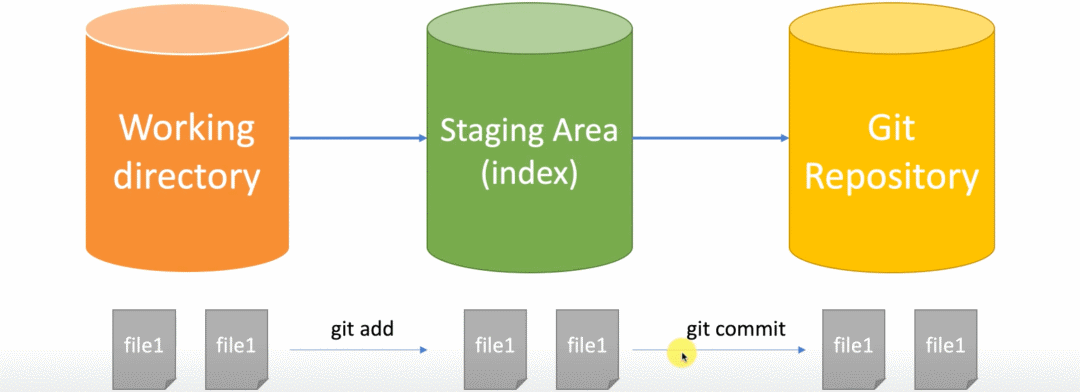
Git 初始化代码仓库
# 左边执行
$ mkdir git-demo
$ cd git-demo && git init
$ rm -rf .git/hooks/*.sample

# 右边执行
$ watch -n 1 -d find .
➜ tree .git
.git
├── HEAD
├── config
├── description
├── hooks
├── info
│   └── exclude
├── objects
│   ├── info
│   └── pack
└── refs
    ├── heads
    └── tags
本地配置文件(.git/config)和全局配置文件(~/.gitconfig)
通过执行如下命令,可以将用户配置记录到本地代码仓库的配置文件中去
git config user.name "demo"
git config user.email "demo@demo.com"
➜ cat .git/config
[core]
    repositoryformatversion = 0
    filemode = true
    bare = false
    logallrefupdates = true
    ignorecase = true
    precomposeunicode = true

[user]
    name = demo
    email = demo@demo.com
blob 类型
commit 类型
tree 类型
# 均无内容
➜ ll .git/objects
total 0
drwxr-xr-x  2 escape  staff    64B Nov 23 20:39 info
drwxr-xr-x  2 escape  staff    64B Nov 23 20:39 pack

➜ ll .git/objects/info
➜ ll .git/objects/pack
➜ cat ./.git/info/exclude
# git ls-files --others --exclude-from=.git/info/exclude
# Lines that start with '#' are comments.
# For a project mostly in C, the following would be a good set of
# exclude patterns (uncomment them if you want to use them):
# *.[oa]
# *~
./.git/hooks/commit-msg.sample
./.git/hooks/pre-rebase.sample
./.git/hooks/pre-commit.sample
./.git/hooks/applypatch-msg.sample
./.git/hooks/fsmonitor-watchman.sample
./.git/hooks/pre-receive.sample
./.git/hooks/prepare-commit-msg.sample
./.git/hooks/post-update.sample
./.git/hooks/pre-merge-commit.sample
./.git/hooks/pre-applypatch.sample
./.git/hooks/pre-push.sample
./.git/hooks/update.sample
➜ cat .git/HEAD
ref: refs/heads/master
# 均无内容
➜ ll .git/refs
total 0
drwxr-xr-x  2 escape  staff    64B Nov 23 20:39 heads
drwxr-xr-x  2 escape  staff    64B Nov 23 20:39 tags

➜ ll .git/refs/heads
➜ ll .git/refs/tags
➜ cat .git/description
Unnamed repository; edit this file 'description' to name the repository.
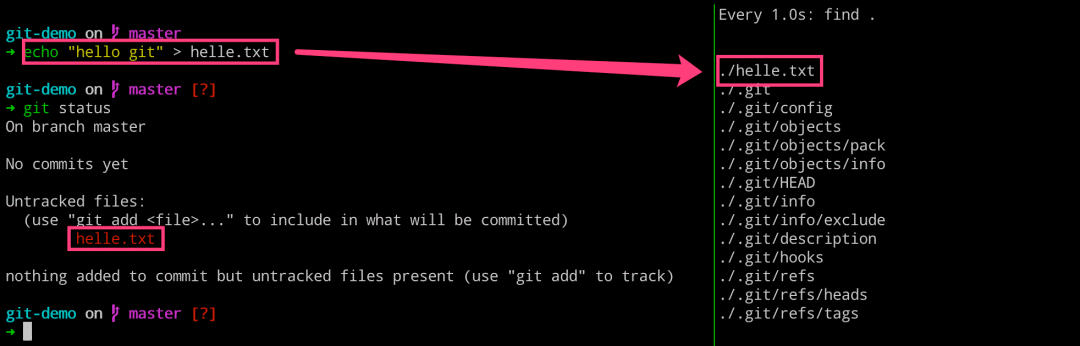
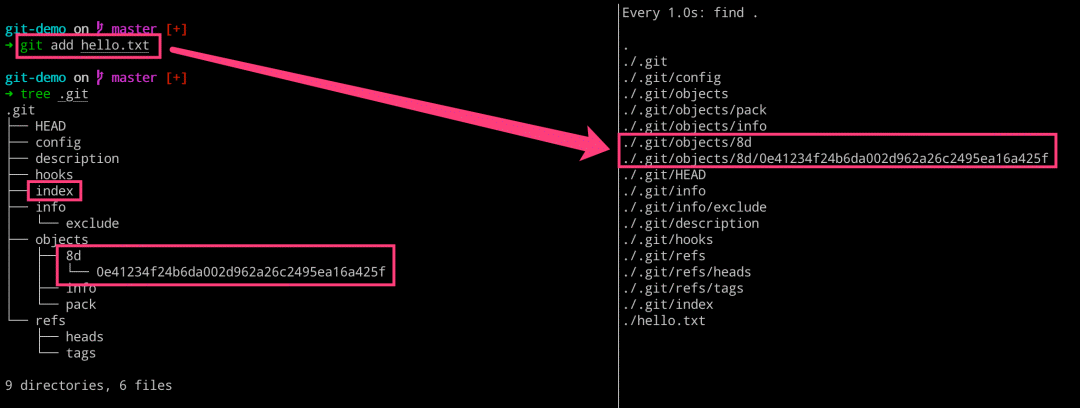
add 之后发生了什么
# 左边执行
$ echo "hello git" > helle.txt
$ git status
$ git add hello.txt

# 右边执行
$ watch -n 1 -d find .
# 查看 objects 的文件类型
$ git cat-file -t 8d0e41
blob

# 查看 objects 的文件内容
$ git cat-file -p 8d0e41
hello git

# 查看 objects 的文件大小
$ git cat-file -s 8d0e41
10

# 拼装起来
blob 10\0hello git
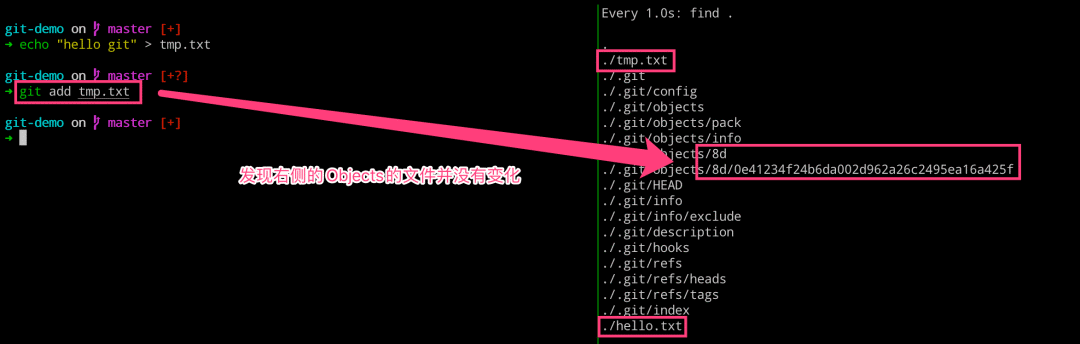
# 左边执行
$ echo "hello git" > tmp.txt
$ git add tmp.txt

# 右边执行
$ watch -n 1 -d find .
理解 blob 对象和 SHA1
MD5 - 128bit - 不安全 - 文件校验
SHA1 - 160bit(40位) - 不安全 - Git 存储
SHA256 - 256bit- 安全 - Docker 镜像
SHA512 - 512bit - 安全
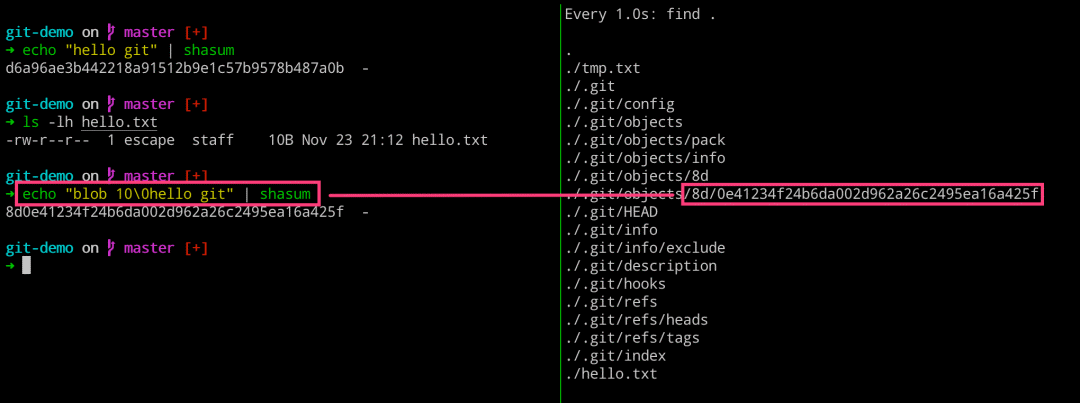
➜ echo "hello git" | shasum
d6a96ae3b442218a91512b9e1c57b9578b487a0b  -
➜ ls -lh hello.txt
-rw-r--r--  1 escape  staff    10B Nov 23 21:12 hello.txt

➜ echo "blob 10\0hello git" | shasum
8d0e41234f24b6da002d962a26c2495ea16a425f  -

# 拼装起来
blob 10\0hello git
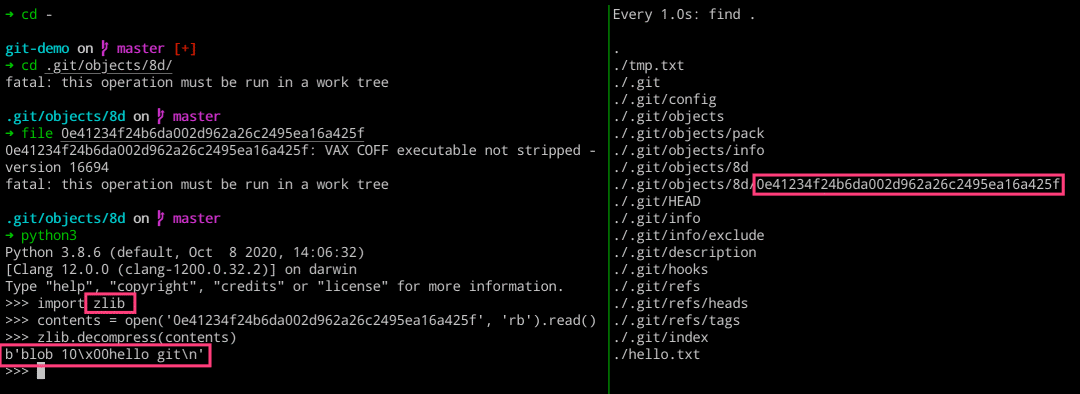
➜ cat .git/objects/8d/0e41234f24b6da002d962a26c2495ea16a425f
xKOR04`HWH,6A%

➜ ls -lh .git/objects/8d/0e41234f24b6da002d962a26c2495ea16a425f
-r--r--r--  1 escape  staff    26B Nov 23 21:36 .git/objects/8d/0e41234f24b6da002d962a26c2495ea16a425f

➜ file .git/objects/8d/0e41234f24b6da002d962a26c2495ea16a425f
.git/objects/8d/0e41234f24b6da002d962a26c2495ea16a425f: VAX COFF executable not stripped - version 16694
import zlib

contents = open('0e41234f24b6da002d962a26c2495ea16a425f', 'rb').read()
zlib.decompress(contents)
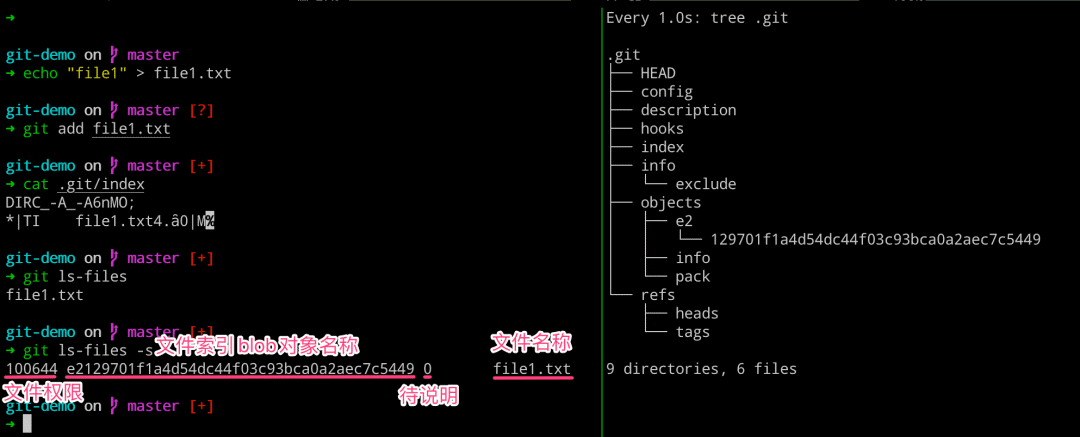
聊聊工作区和暂存区
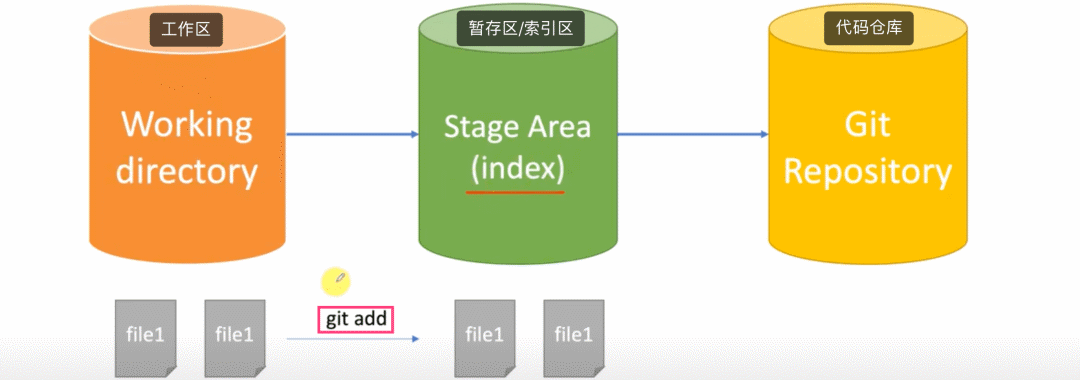
# 左边执行
$ echo "file1" > file1.txt
$ git add file1.txt
$ cat .git/index

$ git ls-files     # 列出当前暂存区的文件列表信息
$ git ls-files -s  # 列出当前暂存区文件的详细信息

# 右边执行
$ watch -n 1 -d tree .git
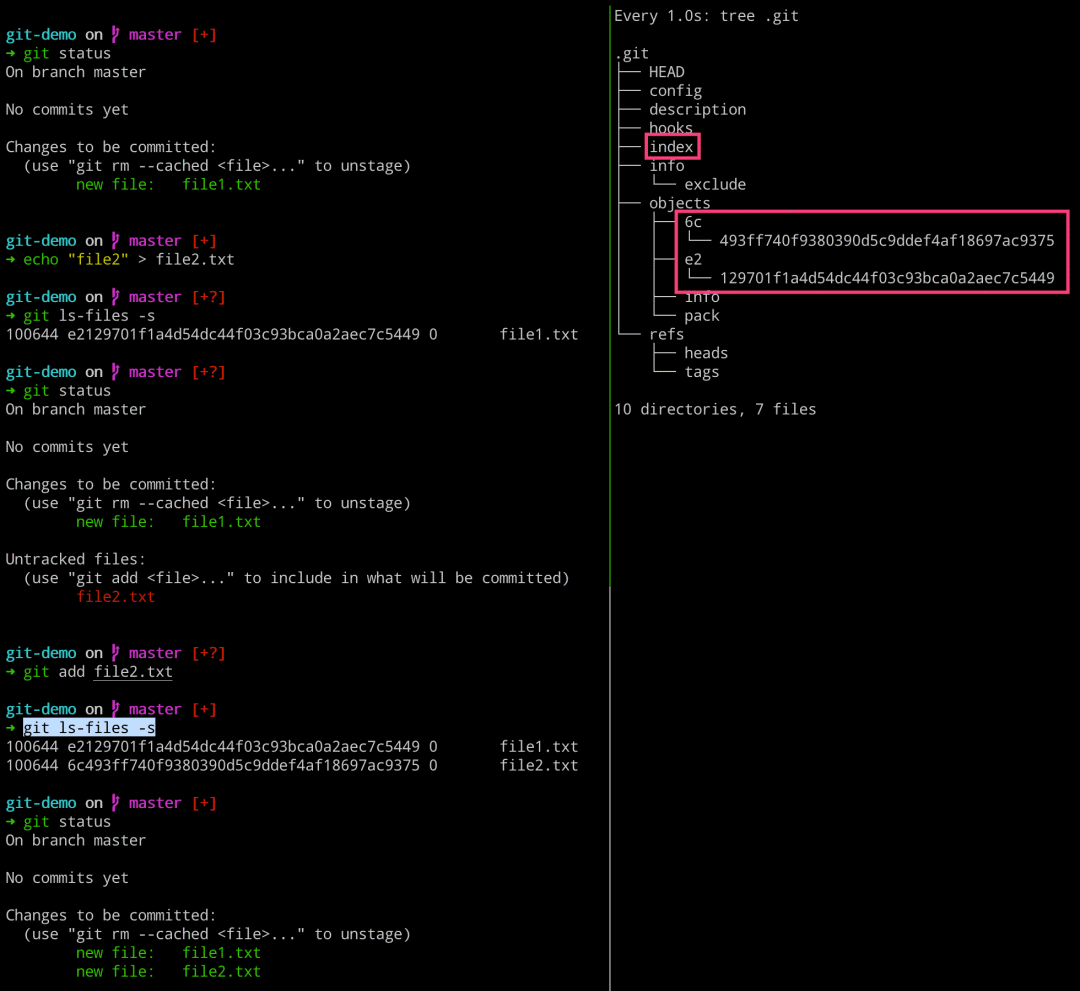
# 左边执行
$ git status
$ echo "file2" > file2.txt
$ git ls-files -s
$ git status
$ git add file2.txt
$ git ls-files -s
$ git status

# 右边执行
$ watch -n 1 -d tree .git
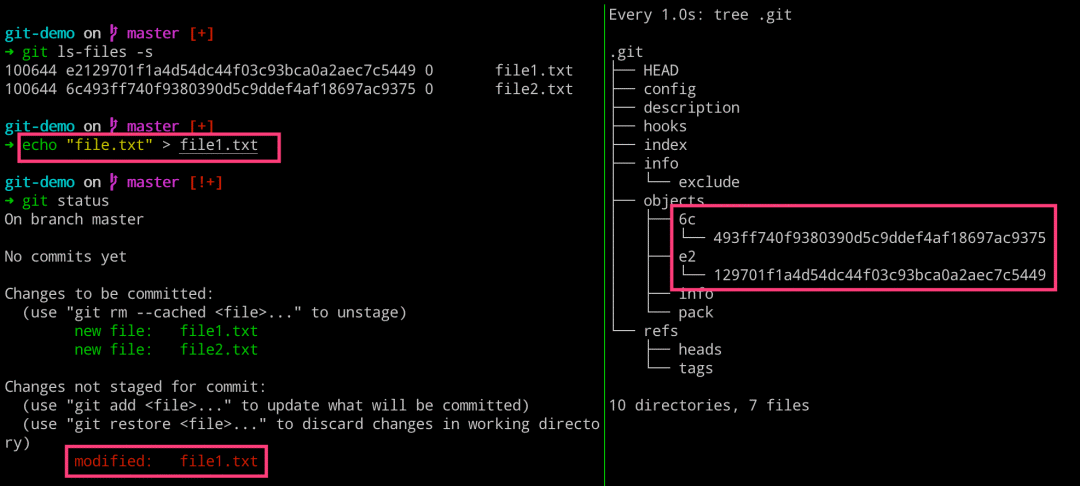
# 左边执行
$ git ls-files -s
$ echo "file.txt" > file1.txt
$ git status

# 右边执行
$ watch -n 1 -d tree .git
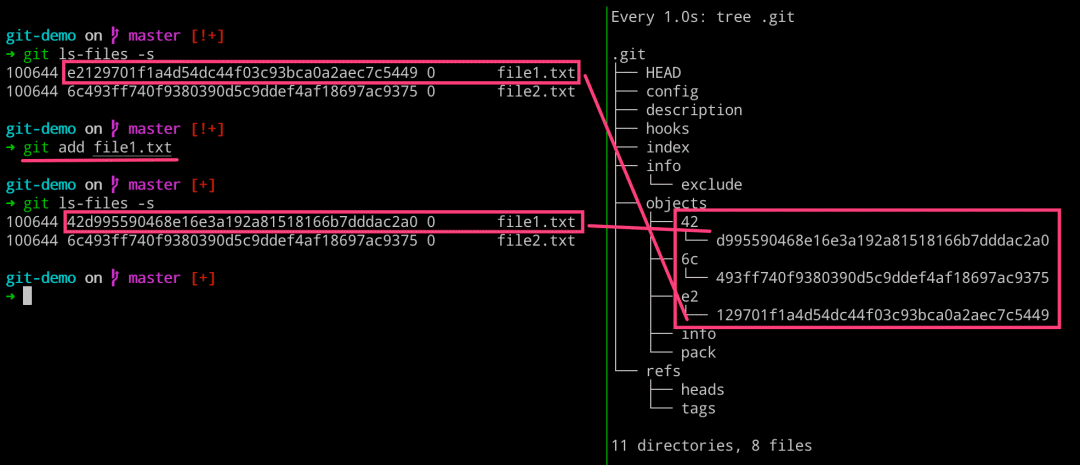
# 左边执行
$ git ls-files -s
$ git add file1.txt
$ git ls-files -s

# 右边执行
$ watch -n 1 -d tree .git
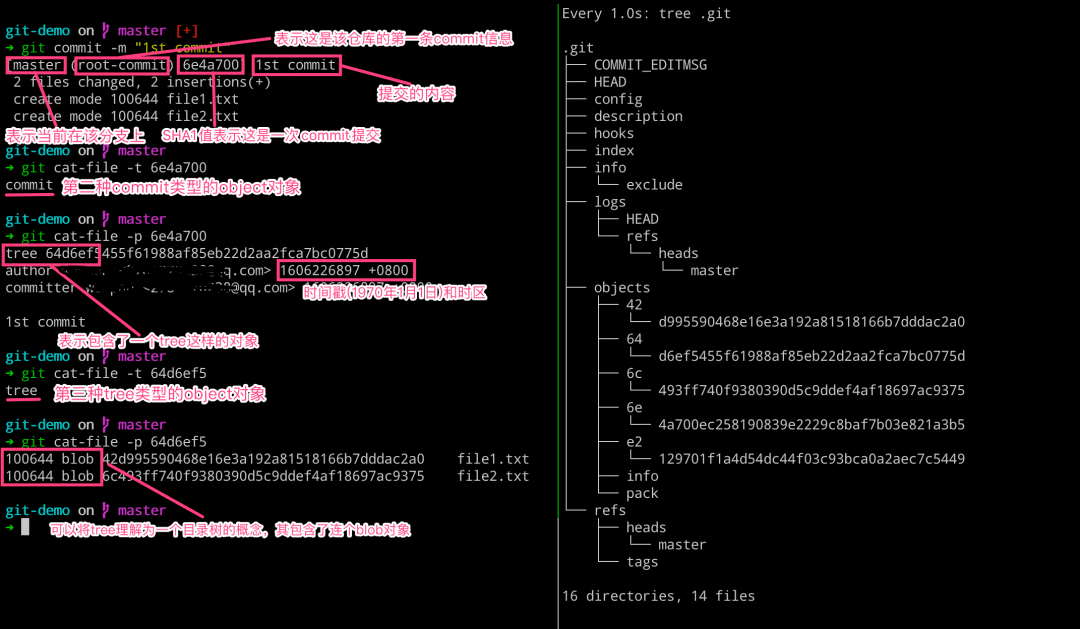
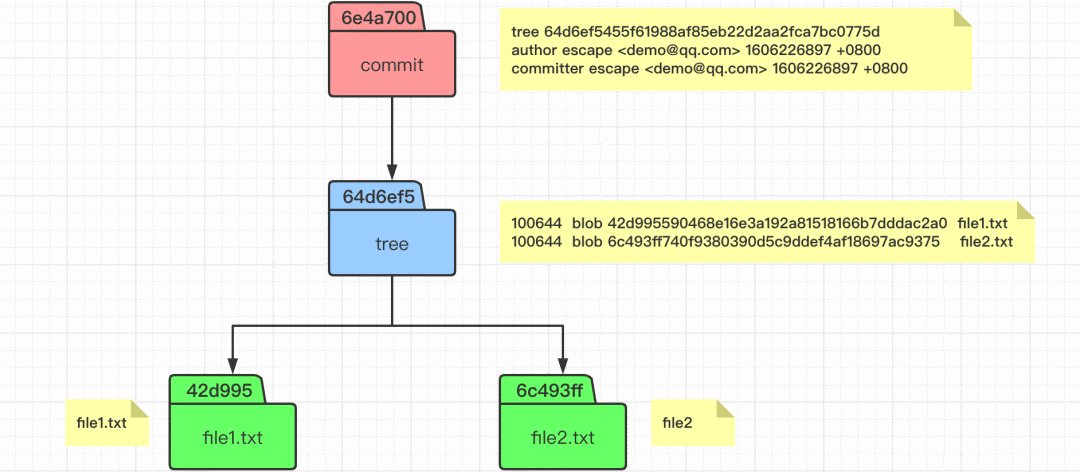
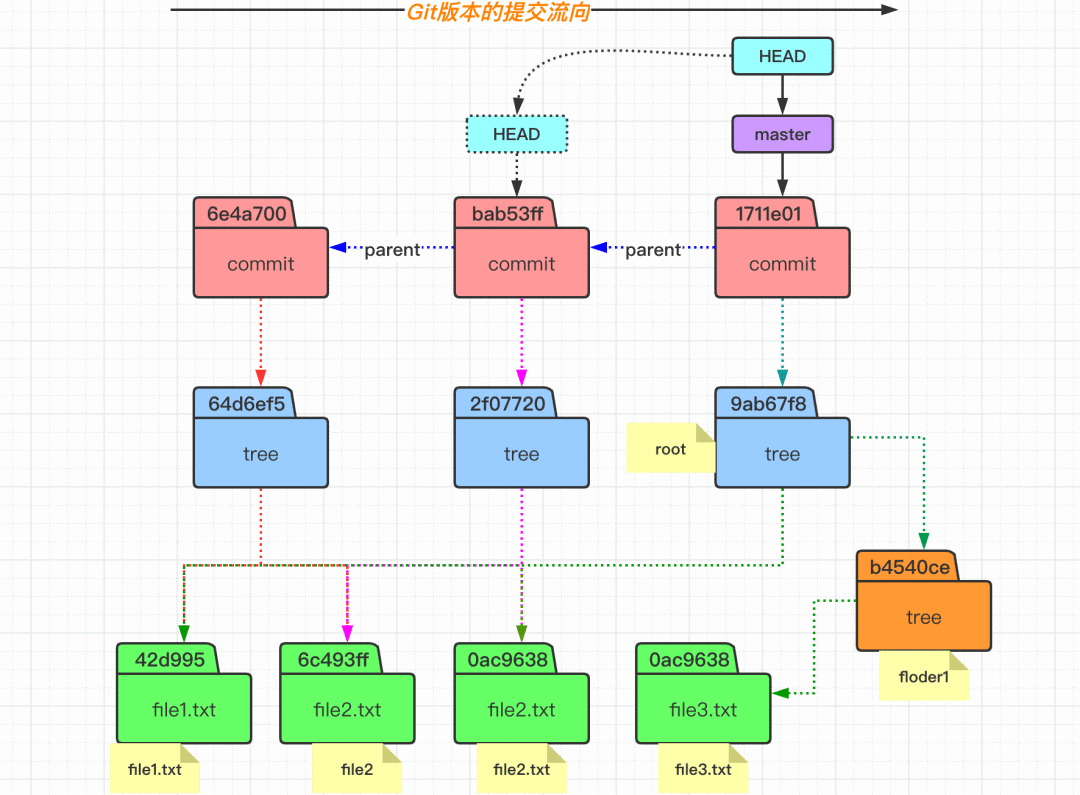
理解 commit 提交原理
# 左边执行
$ git commit -m "1st commit"

$ git cat-file -t 6e4a700  # 查看 commit 对象的类型
$ git cat-file -p 6e4a700  # 查看 commit 对象的内容

$ git cat-file -t 64d6ef5  # 查看 tree 对象的类型
$ git cat-file -p 64d6ef5  # 查看 tree 对象的内容

# 右边执行
$ watch -n 1 -d tree .git
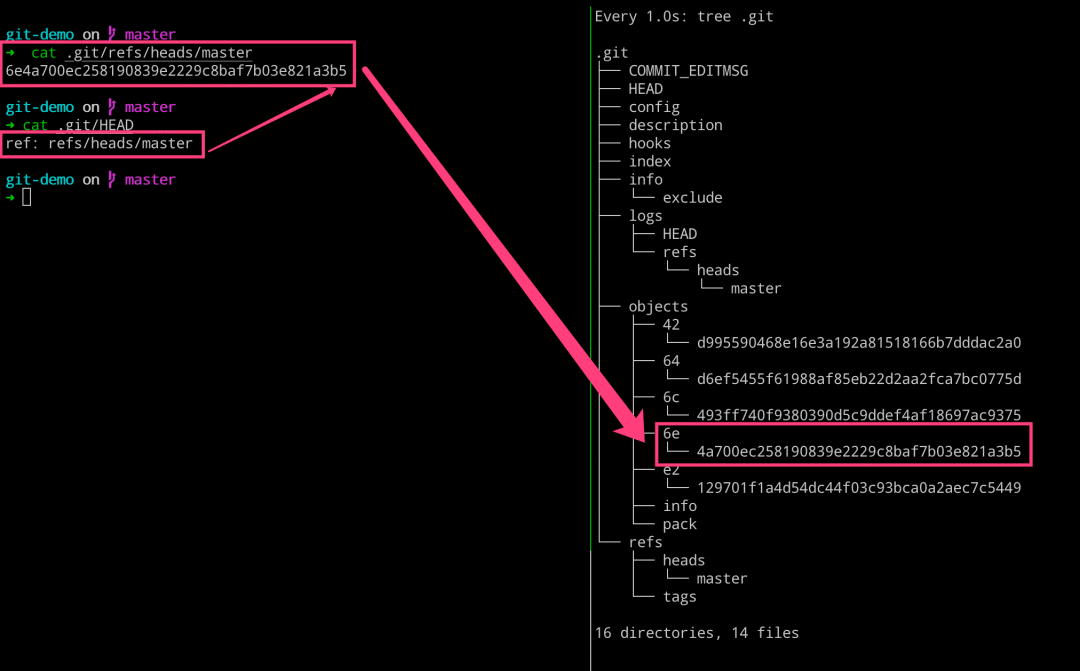
# 左边执行
$ cat .git/refs/heads/master
$ cat .git/HEAD

# 右边执行
$ watch -n 1 -d tree .git
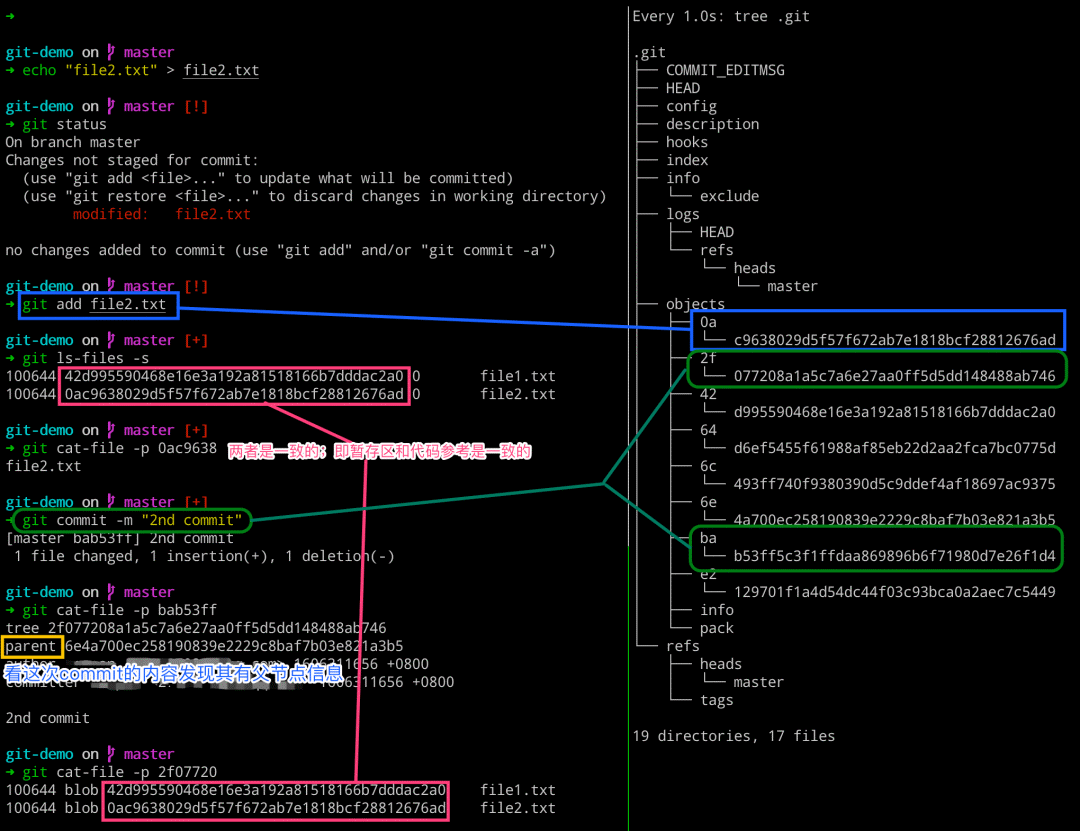
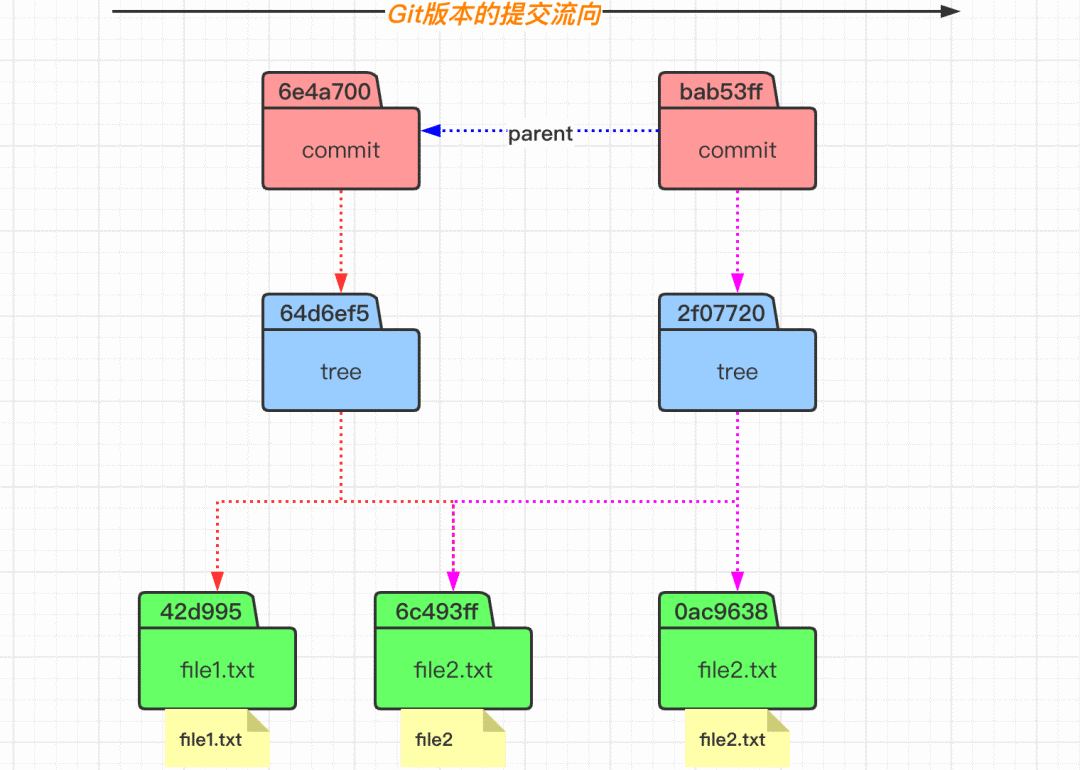
加深理解 commit 提交
# 左边执行
$ echo "file2.txt" > file2.txt
$ git status
$ git add file2.txt
$ git ls-files -s
$ git cat-file -p 0ac9638
$ git commit -m "2nd commit"
$ git cat-file -p bab53ff
$ git cat-file -p 2f07720

# 右边执行
$ watch -n 1 -d tree .git
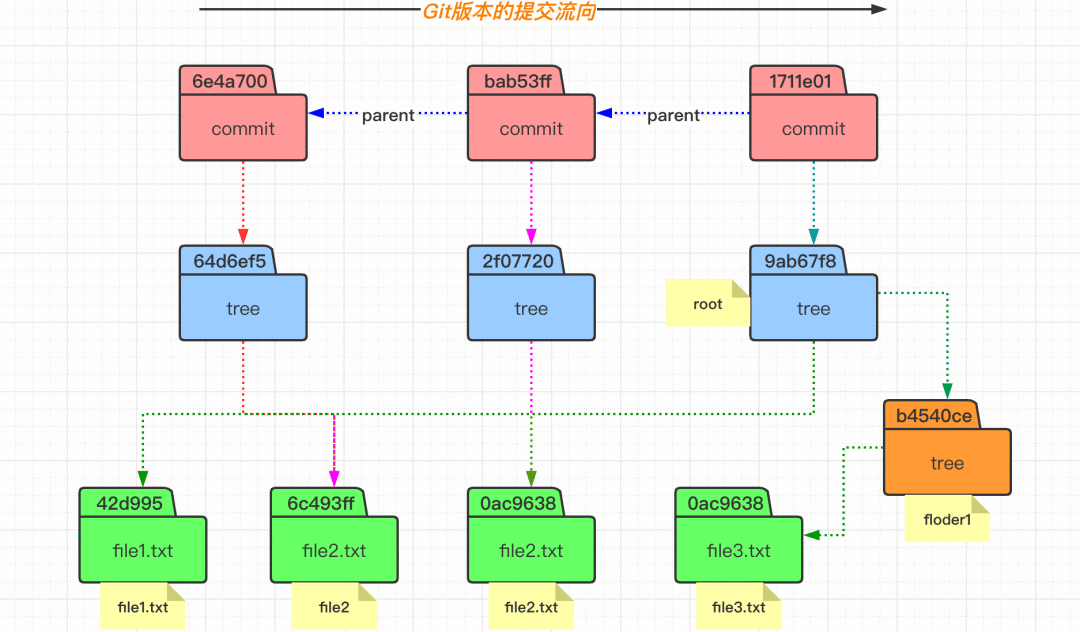
# 左边执行
$ mkdir floder1
$ echo "file3" > floder1/file3.txt
$ git add floder1
$ git ls-files -s
$ git commit -m "3rd commit"
$ git cat-file -p 1711e01
$ git cat-file -p 9ab67f8

# 右边执行
$ watch -n 1 -d tree .git
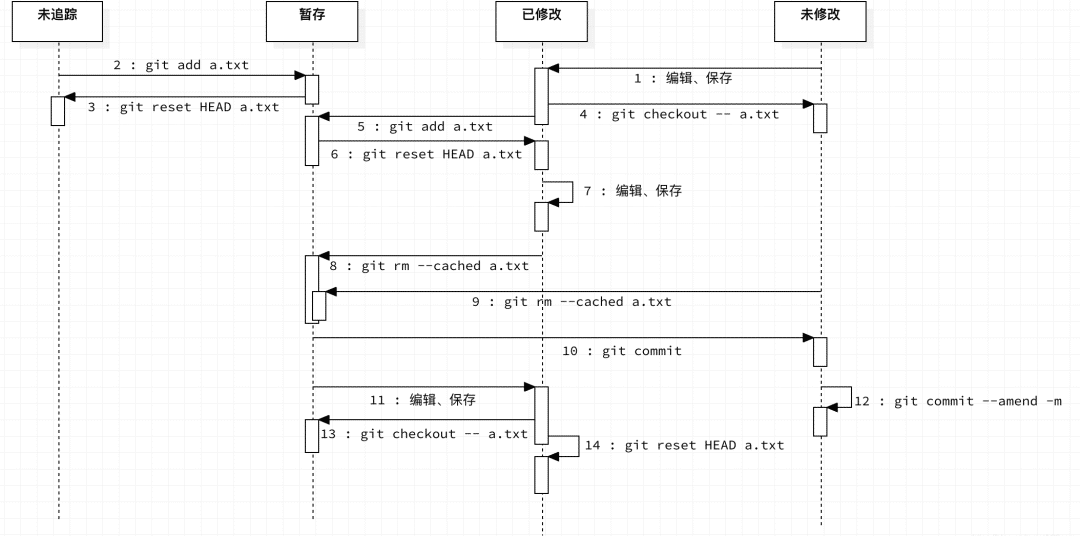
文件的生命周期状态
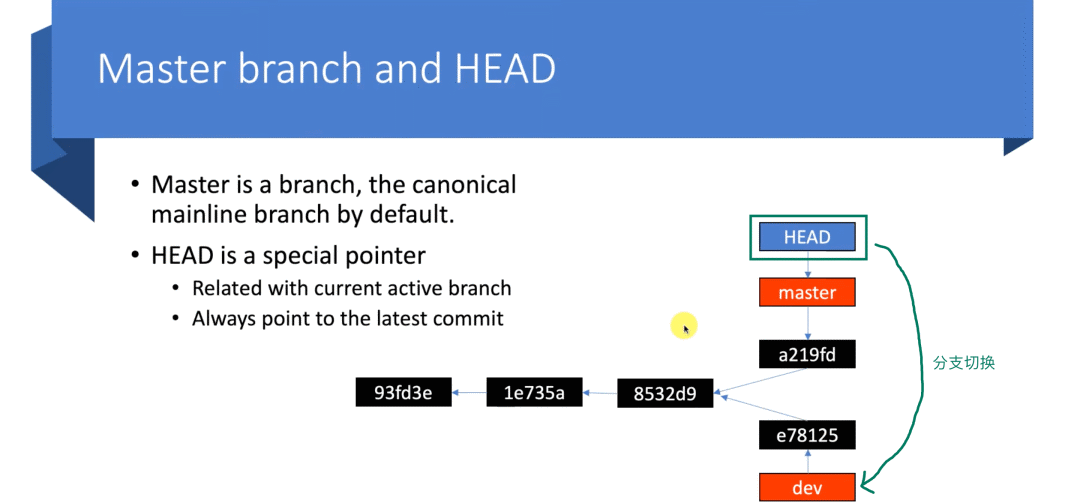
Branch 和 HEAD 的意义
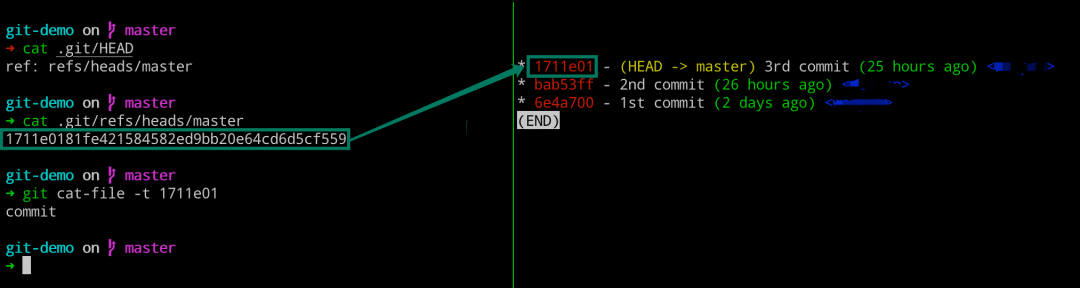
# 左边执行
$ cat .git/HEAD
$ cat .git/refs/heads/master
$ git cat-file -t 1711e01

# 右边执行
$ glo = git log
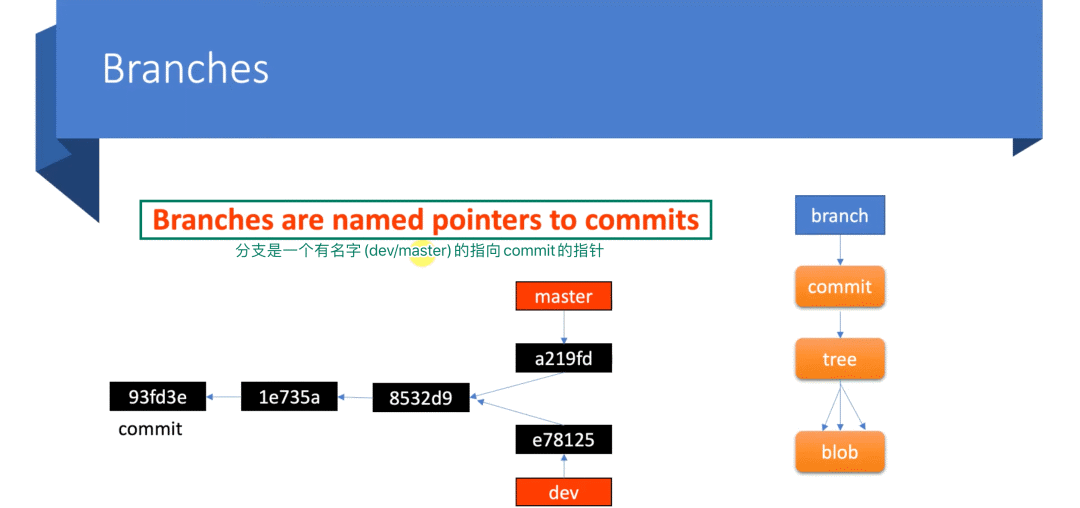
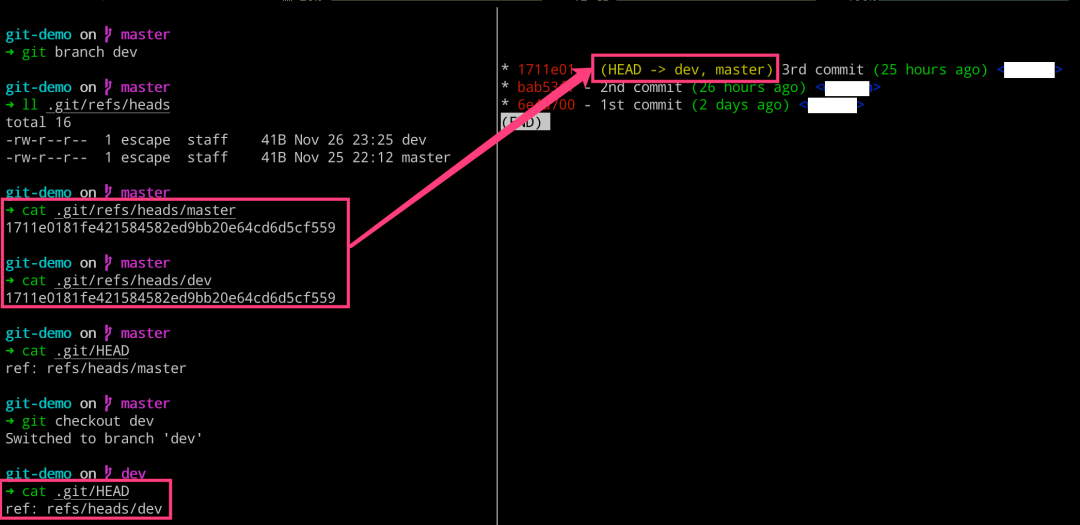
分支操作的背后逻辑
# 左边执行
$ git branch
$ git branch dev
$ ll .git/refs/heads
$ cat .git/refs/heads/master
$ cat .git/refs/heads/dev
$ cat .git/HEAD
$ git checkout dev
$ cat .git/HEAD

# 右边执行
$ glo = git log
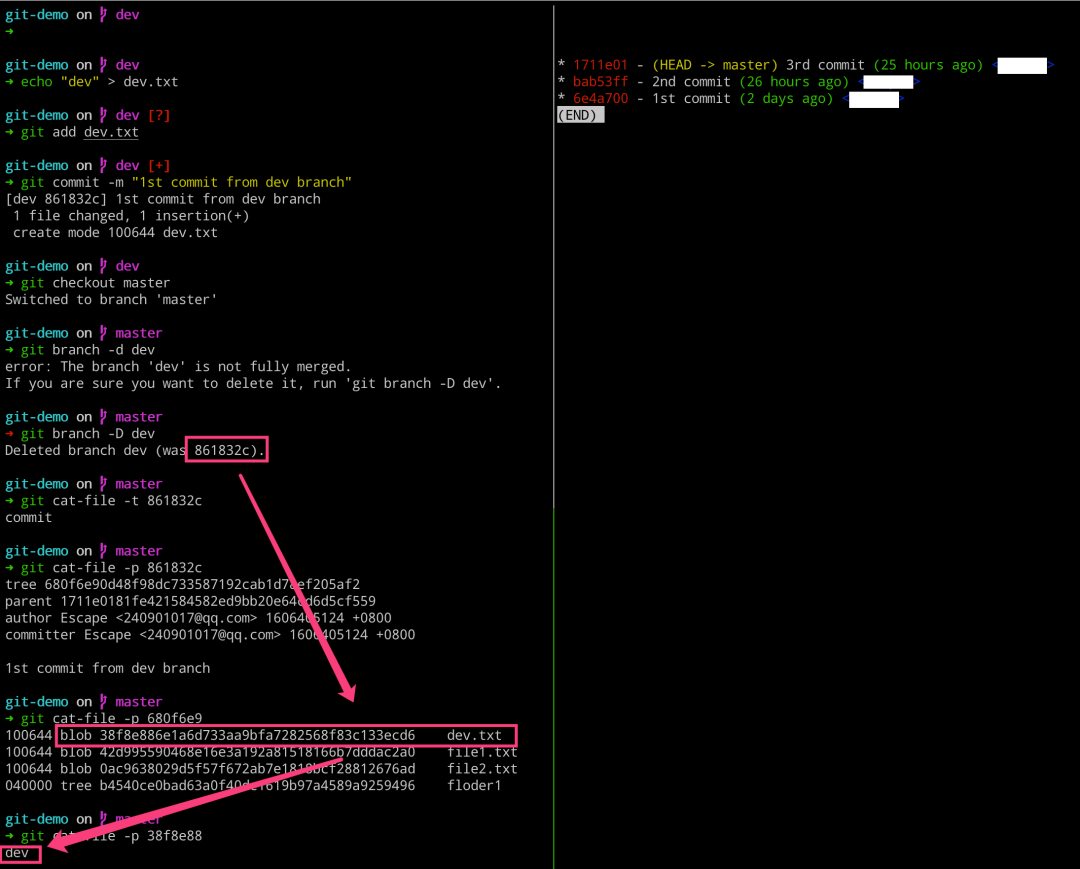
# 左边执行
$ echo "dev" > dev.txt
$ git add dev.txt
$ git commit -m "1st commit from dev branch"
$ git checkout master
$ git branch -d dev
$ git branch -D dev
$ git cat-file -t 861832c
$ git cat-file -p 861832c
$ git cat-file -p 680f6e9
$ git cat-file -p 38f8e88

# 右边执行
$ glo = git log
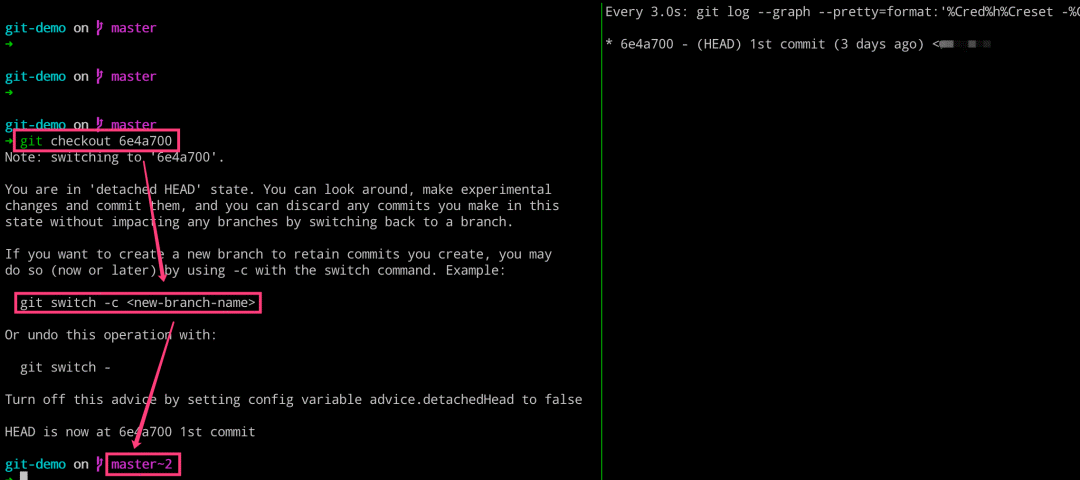
checkout 和 commit 操作
# 左边执行
$ git checkout 6e4a700
$ git log

# 右边执行
$ glo = git log
$ git checkout -b tmp
$ git log
[费劲不太好,下下策]
在 objects 目录下面,自己一个一个看,然后切换过去。
[推荐的操作方式]
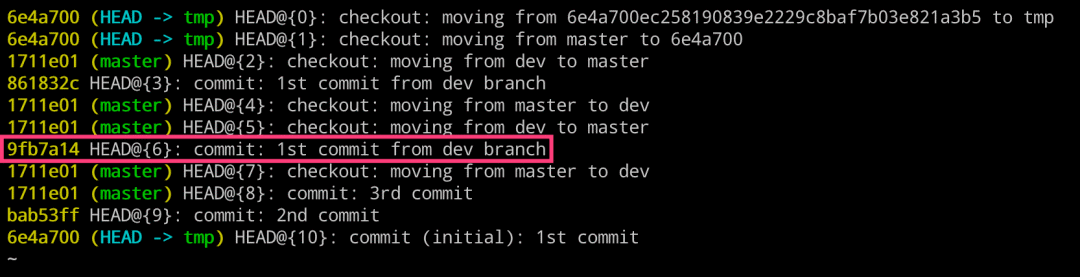
使用 Git 提供的 git reflog 专用命令来查找。
该命令的作用就是用于将我们之前的所有操作都记录下来。
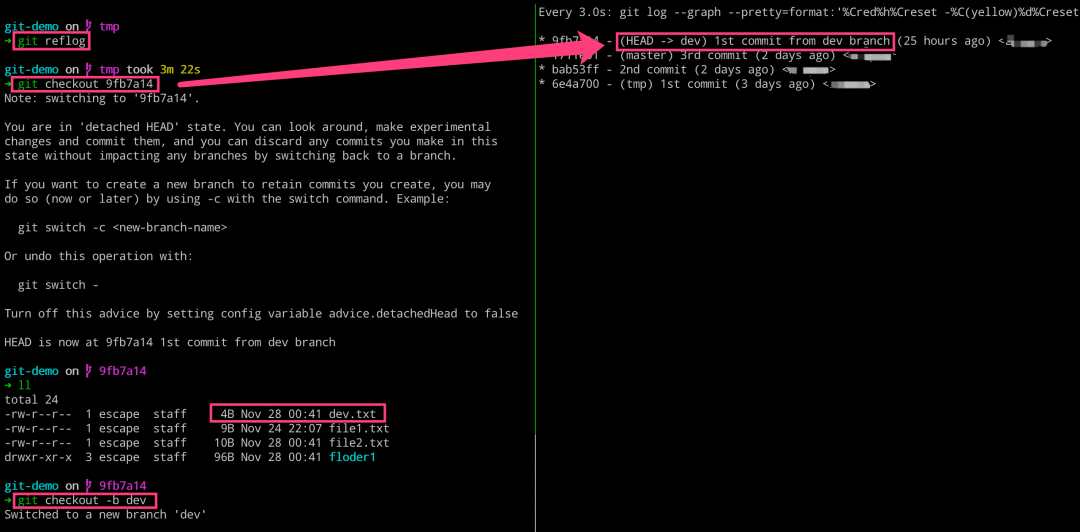
# 左边执行
$ git reflog
$ git checkout 9fb7a14
$ git checkout -b dev

# 右边执行
$ glo = git log
聊聊 diff 的执行逻辑
$ echo "hello" > file1.txt
$ git diff
$ git cat-file -p 42d9955
$ git cat-file -p ce01362

# 下述命令原理也是一样的
$ git diff --cached
$ git diff HEAD

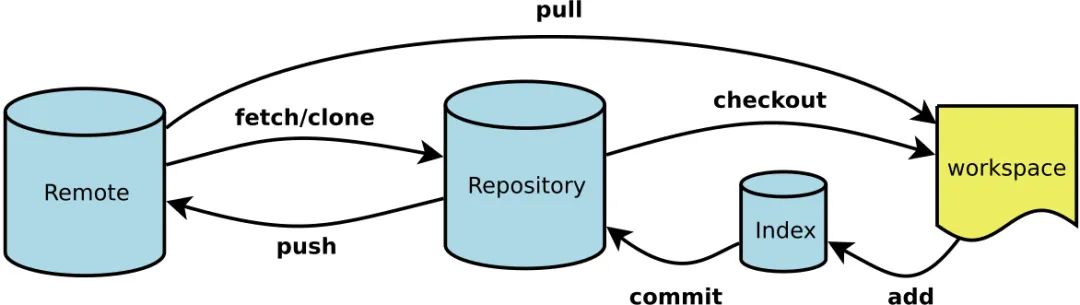
Git 如何添加远程仓库
$ git init
$ git add README.md
$ git commit -m "first commit"
# 关联远程仓库
$ git remote add origin git@github.com:escapelife/git-demo.git
➜ cat .git/config
[core]
    repositoryformatversion = 0
    filemode = true
    bare = false
    logallrefupdates = true
    ignorecase = true
    precomposeunicode = true

[remote "origin"]
    url = git@github.com:escapelife/git-demo.git
    fetch = +refs/heads/*:refs/remotes/origin/*
# 推送本地分支
$ git push -u origin master
➜ tree .git
├── logs
│   ├── HEAD
│   └── refs
│       ├── heads
│       │   ├── dev
│       │   ├── master
│       │   └── tmp
│       └── remotes     # 新增目录
│           └── origin  # 新增目录
│               └── master  # 新增文件
└── refs
    ├── heads
    │   ├── dev
    │   ├── master
    │   └── tmp
    ├── remotes     # 新增目录
    │   └── origin  # 新增目录
    │       └── master  # 新增文件
    └── tags
远程仓库存储代码
