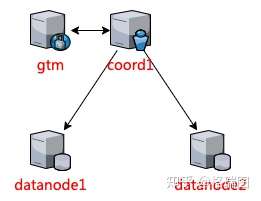
准备搭建一个 postgres-xl 集群:
4 个节点,1 个 GTM,1 个 Coordinator,2 个 Datanode。

然后研究一下 postgres-xl 技术架构~
首先先部署 4 台虚机~
(1)本系列文章
1、部署虚机
(1)克隆虚机 4 台
# #########################################################
# step1.provision postgres-xl vms - xl122
# #########################################################
pdsh -w home -l root "virt-clone --original template101 --name xl122 --file /data/sdb1/kvm/xl122.qcow2"
pdsh -w home -l root "virt-sysprep -d xl122 --hostname xl122"
pdsh -w home -l root "virt-edit -d xl122 /etc/sysconfig/network-scripts/ifcfg-eth0 -e 's/192.168.1.101/192.168.1.122/'"
# #########################################################


# #########################################################
# step1.provision postgres-xl vms - xl123
# #########################################################
pdsh -w home -l root "virt-clone --original template101 --name xl123 --file /data/sdc1/kvm/xl123.qcow2"
pdsh -w home -l root "virt-sysprep -d xl123 --hostname xl123"
pdsh -w home -l root "virt-edit -d xl123 /etc/sysconfig/network-scripts/ifcfg-eth0 -e 's/192.168.1.101/192.168.1.123/'"
# #########################################################


# #########################################################
# step1.provision postgres-xl vms - xl124
# #########################################################
pdsh -w home -l root "virt-clone --original template101 --name xl124 --file /data/sdd1/kvm/xl124.qcow2"
pdsh -w home -l root "virt-sysprep -d xl124 --hostname xl124"
pdsh -w home -l root "virt-edit -d xl124 /etc/sysconfig/network-scripts/ifcfg-eth0 -e 's/192.168.1.101/192.168.1.124/'"
# #########################################################


# #########################################################
# step1.provision postgres-xl vms - xl125
# #########################################################
pdsh -w home -l root "virt-clone --original template101 --name xl125 --file /data/sde1/kvm/xl125.qcow2"
pdsh -w home -l root "virt-sysprep -d xl125 --hostname xl125"
pdsh -w home -l root "virt-edit -d xl125 /etc/sysconfig/network-scripts/ifcfg-eth0 -e 's/192.168.1.101/192.168.1.125/'"
# #########################################################
(2)调整内存
# #########################################################
# step2.check and change mem of vm
# #########################################################
pdsh -w home -l root 'virsh dominfo   xl122 | grep memory'
pdsh -w home -l root 'virsh setmaxmem xl122 8G --config'
pdsh -w home -l root 'virsh setmem    xl122 8G --config'
pdsh -w home -l root 'virsh dominfo   xl122 | grep memory'
pdsh -w home -l root 'virsh dominfo   xl123 | grep memory'
pdsh -w home -l root 'virsh setmaxmem xl123 8G --config'
pdsh -w home -l root 'virsh setmem    xl123 8G --config'
pdsh -w home -l root 'virsh dominfo   xl123 | grep memory'
pdsh -w home -l root 'virsh dominfo   xl124 | grep memory'
pdsh -w home -l root 'virsh setmaxmem xl124 8G --config'
pdsh -w home -l root 'virsh setmem    xl124 8G --config'
pdsh -w home -l root 'virsh dominfo   xl124 | grep memory'
pdsh -w home -l root 'virsh dominfo   xl125 | grep memory'
pdsh -w home -l root 'virsh setmaxmem xl125 8G --config'
pdsh -w home -l root 'virsh setmem    xl125 8G --config'
pdsh -w home -l root 'virsh dominfo   xl125 | grep memory'
# #########################################################
(3)启动虚机
# #########################################################
# step3.start postgres-xl vms
# #########################################################
pdsh -w home -l root virsh start xl122
pdsh -w home -l root virsh start xl123
pdsh -w home -l root virsh start xl124
pdsh -w home -l root virsh start xl125
pdsh -w home -l root virsh list
# #########################################################
(4)免密登录 - 控制机
# #########################################################
# step4.passwdless login
# #########################################################
sshpass -p '123456' ssh-copy-id -f root@xl122
sshpass -p '123456' ssh-copy-id -f root@xl123
sshpass -p '123456' ssh-copy-id -f root@xl124
sshpass -p '123456' ssh-copy-id -f root@xl125
# #########################################################
(5)关闭防火墙 禁用 SELinux
# #########################################################
# step5.disable firewalld selinux
# #########################################################
pdsh -w xl[122-125] -l root "echo -e 'LANG=en_US.utf-8\nLC_ALL=en_US.utf-8\n' > /etc/environment"
pdsh -w xl[122-125] -l root 'systemctl stop firewalld.service'
pdsh -w xl[122-125] -l root 'systemctl disable firewalld.service'
pdsh -w xl[122-125] -l root sestatus
pdsh -w xl[122-125] -l root 'sed -i "s/SELINUX=enforcing/SELINUX=disabled/g" /etc/selinux/config'
pdsh -w xl[122-125] -l root 'grep "SELINUX=disabled" /etc/selinux/config'
# #########################################################
(6)设置主机名和主机文件
# #########################################################
# step6.setup hostname & hosts file
# #########################################################
pdsh -w xl122       -l root 'hostnamectl set-hostname gtm'
pdsh -w xl123       -l root 'hostnamectl set-hostname coord1'
pdsh -w xl124       -l root 'hostnamectl set-hostname datanode1'
pdsh -w xl125       -l root 'hostnamectl set-hostname datanode2'
pdsh -w xl[122-125] -l root "hostnamectl"
pdsh -w xl[122-125] -l root "sed -i '/192.168.1.12/d' /etc/hosts"
pdsh -w xl[122-125] -l root 'echo -e "192.168.1.122 xl122\n192.168.1.123 xl123\n192.168.1.124 xl124\n192.168.1.125 xl125\n" >> /etc/hosts'
pdsh -w xl[122-125] -l root 'echo -e "192.168.1.122 gtm\n192.168.1.123 coord1\n192.168.1.124 datanode1\n192.168.1.125 datanode2\n" >> /etc/hosts'
pdsh -w xl[122-125] -l root 'cat /etc/hosts'
# #########################################################
(7)检查时间
# #########################################################
# step7.setup synchronizing system clocks
# #########################################################
pdsh -w xl[122-125] -l root 'date'
# #########################################################
(8)添加用户及属组
# #########################################################
# step8.setup user & group
# #########################################################
pdsh -w xl[122-125] -l root 'groupadd postgres'
pdsh -w xl[122-125] -l root 'useradd postgres -r -m -g postgres'
pdsh -w xl[122-125] -l root "echo -e '123456\n123456\n' | passwd postgres"
# #########################################################
(9)免密登录 - 控制机
# #########################################################
# step9.passwdless login
# #########################################################
sshpass -p '123456' ssh-copy-id -f postgres@xl122
sshpass -p '123456' ssh-copy-id -f postgres@xl123
sshpass -p '123456' ssh-copy-id -f postgres@xl124
sshpass -p '123456' ssh-copy-id -f postgres@xl125
# #########################################################
(10)免密登录 - 集群间
# #########################################################
# step10.setup passwdless login in cluster
# #########################################################
pdsh -w xl[122-125] -l root 'mkdir -p /root/.ssh'
scp -r id_rsa* root@xl122:/root/.ssh
scp -r id_rsa* root@xl123:/root/.ssh
scp -r id_rsa* root@xl124:/root/.ssh
scp -r id_rsa* root@xl125:/root/.ssh
pdsh -w xl[122-125] -l postgres 'mkdir -p /home/postgres/.ssh'
scp -r id_rsa* postgres@xl122:/home/postgres/.ssh
scp -r id_rsa* postgres@xl123:/home/postgres/.ssh
scp -r id_rsa* postgres@xl124:/home/postgres/.ssh
scp -r id_rsa* postgres@xl125:/home/postgres/.ssh
pdsh -w xl[122-125] -l root 'yum install -y sshpass'
pdsh -w xl[122-125] -l postgres "sshpass -p '123456' ssh-copy-id -o StrictHostKeyChecking=no -f xl122"
pdsh -w xl[122-125] -l postgres "sshpass -p '123456' ssh-copy-id -o StrictHostKeyChecking=no -f xl123"
pdsh -w xl[122-125] -l postgres "sshpass -p '123456' ssh-copy-id -o StrictHostKeyChecking=no -f xl124"
pdsh -w xl[122-125] -l postgres "sshpass -p '123456' ssh-copy-id -o StrictHostKeyChecking=no -f xl125"
# #########################################################
(11)重启使配置生效
# #########################################################
# step11.reboot postgres-xl vm cluster
# #########################################################
pdsh -w home -l root virsh reboot xl122
pdsh -w home -l root virsh reboot xl123
pdsh -w home -l root virsh reboot xl124
pdsh -w home -l root virsh reboot xl125
pdsh -w home -l root virsh list
# #########################################################
(12)关机
# #########################################################
# step12.shutdown postgres-xl vm cluster
# #########################################################
pdsh -w home -l root virsh shutdown xl122
pdsh -w home -l root virsh shutdown xl123
pdsh -w home -l root virsh shutdown xl124
pdsh -w home -l root virsh shutdown xl125
pdsh -w home -l root virsh list
# #########################################################
2、后记
脚本一路运行下来,在 home 主机创建 4 台虚机 xl[122-125]。
环境已准备好,步骤(12)关机休息 ~
接下来开始下载源码进行编译安装 ~
来源 https://zhuanlan.zhihu.com/p/504749399
