部署规划
这一节介绍 OceanBase 集群三节点部署方法,需要通过中控机直接远程登录到 OceanBase 节点上部署启动 observer 和 obproxy 进程。
- 机器信息如下:
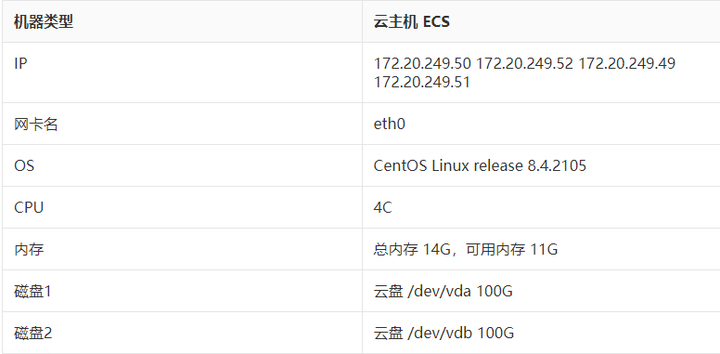
- 机器划分如下:
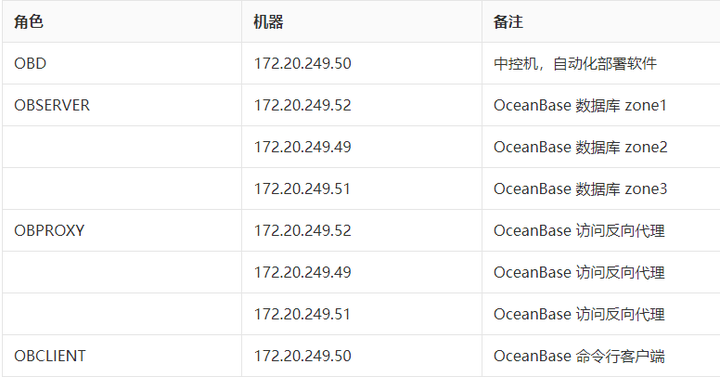
OceanBase 命令行客户端
- 磁盘划分
磁盘划分,这里就使用 LVM 技术对 /dev/vdb 进行划分。需要登录到每个节点上手动初始化。
# lvm 分盘
pvcreate /dev/vdb
vgcreate obvg /dev/vdb
lvcreate obvg -L 20G^C
lvcreate -L 20G obvg -n lvredo
lvcreate -l FREE obvg -n lvdata

# 格式化文件系统
mkfs.ext4 /dev/obvg/lvdata
mkfs.ext4 /dev/obvg/lvredo

# 修改 mount 参数文件
vim /etc/fstab
/dev/obvg/lvredo          /redo              ext4            defaults,noatime,nodiratime,nodelalloc,barrier=0        0 0
/dev/obvg/lvdata             /data         ext4            defaults,noatime,nodiratime,nodelalloc,barrier=0        0 0

# 挂载文件系统
mkdir -p /data /redo
vim /etc/fstab
mount /data
mount /redo
chown -R admin.admin /data /redo

# 检查
df -h

输出:
文件系统                 容量  已用  可用 已用% 挂载点
/dev/mapper/obvg-lvdata   59G   53M   56G    1% /data
/dev/mapper/obvg-lvredo   20G   45M   19G    1% /redo
编辑 OBD 配置文件
OBD 针对不同的部署场景提供不同的配置文件。这些配置文件示例在 OceanBase 开源项目地址里,具体是:https://github.com/oceanbase/obdeploy/tree/master/example 。
如果是部署单节点版本,就下载其中两个配置文件:
- 部署三节点
observer进程: https://github.com/oceanbase/obdeploy/blob/master/example/mini-distributed-example.yaml - 部署三节点
observer和obproxy进程:https://github.com/oceanbase/obdeploy/blob/master/example/mini-distributed-with-obproxy-example.yaml
这里仿照生产环境,选择第二种部署配置文件。
[admin@obce00 ~]$ cat obce-3zones.yaml

#  Only need to configure when remote login is required
<p id="only-need-to-configure-when-remote-login-is-required"></p>

user:username: admin
#    password: your password if needkey_file: /home/admin/.ssh/id_rsa.pubport: your ssh port, default 22
#    timeout: ssh connection timeout (second), default 30
oceanbase-ce:servers:- name: obce01# Please don't use hostname, only IP can be supportedip: 172.20.249.52- name: obce02ip: 172.20.249.49- name: obce03ip: 172.20.249.51global:# Please set devname as the network adaptor's name whose ip is  in the setting of severs.# if set severs as "127.0.0.1", please set devname as "lo"# if current ip is 192.168.1.10, and the ip's network adaptor's name is "eth0", please use "eth0"devname: eth0cluster_id: 2# please set memory limit to a suitable value which is matching resource.memory_limit: 8G # The maximum running memory for an observersystem_memory: 3G # The reserved system memory. system_memory is reserved for general tenants. The default value is 30G.stack_size: 512Kcpu_count: 16cache_wash_threshold: 1G__min_full_resource_pool_memory: 268435456workers_per_cpu_quota: 10schema_history_expire_time: 1d# The value of net_thread_count had better be same as cpu's core number.net_thread_count: 4major_freeze_duty_time: Disableminor_freeze_times: 10enable_separate_sys_clog: 0enable_merge_by_turn: FALSE#datafile_disk_percentage: 20 # The percentage of the data_dir space to the total disk space. This value takes effect only when datafile_size is 0. The default value is 90.datafile_size: 50Gsyslog_level: WARN # System log level. The default value is INFO.enable_syslog_wf: false # Print system logs whose levels are higher than WARNING to a separate log file. The default value is true.enable_syslog_recycle: true # Enable auto system log recycling or not. The default value is false.max_syslog_file_count: 10 # The maximum number of reserved log files before enabling auto recycling. The default value is 0.# observer cluster name, consistent with obproxy's cluster_nameappname: obce-3zonesroot_password: 0EI5N08d # root user password, can be emptyproxyro_password: uY7Yf8zx # proxyro user pasword, consistent with obproxy's observer_sys_password, can be emptyobce01:mysql_port: 2881 # External port for OceanBase Database. The default value is 2881.rpc_port: 2882 # Internal port for OceanBase Database. The default value is 2882.#  The working directory for OceanBase Database. OceanBase Database is started under this directory. This is a required field.home_path: /home/admin/oceanbase-ce# The directory for data storage. The default value is $home_path/store.data_dir: /data# The directory for clog, ilog, and slog. The default value is the same as the data_dir value.redo_dir: /redozone: zone1obce02:mysql_port: 2881 # External port for OceanBase Database. The default value is 2881.rpc_port: 2882 # Internal port for OceanBase Database. The default value is 2882.#  The working directory for OceanBase Database. OceanBase Database is started under this directory. This is a required field.home_path: /home/admin/oceanbase-ce# The directory for data storage. The default value is $home_path/store.data_dir: /data# The directory for clog, ilog, and slog. The default value is the same as the data_dir value.redo_dir: /redozone: zone2obce03:mysql_port: 2881 # External port for OceanBase Database. The default value is 2881.rpc_port: 2882 # Internal port for OceanBase Database. The default value is 2882.#  The working directory for OceanBase Database. OceanBase Database is started under this directory. This is a required field.home_path: /home/admin/oceanbase-ce# The directory for data storage. The default value is $home_path/store.data_dir: /data# The directory for clog, ilog, and slog. The default value is the same as the data_dir value.redo_dir: /redozone: zone3
obproxy:servers:- 172.20.249.52- 172.20.249.49- 172.20.249.51# Set dependent components for the component.# When the associated configurations are not done, OBD will automatically get the these configurations from the dependent components.depends:- oceanbase-ceglobal:listen_port: 2883 # External port. The default value is 2883.prometheus_listen_port: 2884 # The Prometheus port. The default value is 2884.home_path: /home/admin/obproxy# oceanbase root server list# format: ip:mysql_port;ip:mysql_portrs_list: 172.20.249.52:2881;172.20.249.49:2881;172.20.249.51:2881enable_cluster_checkout: false# observer cluster name, consistent with oceanbase-ce's appnamecluster_name: obce-3zonesobproxy_sys_password: 0MdTv1tm # obproxy sys user password, can be emptyobserver_sys_password: uY7Yf8zx # proxyro user pasword, consistent with oceanbase-ce's proxyro_password, can be empty
这个配置文件是专门针对小内存(可用内存大于 8G)的节点配置,里面指定了很多进程 observer 的启动参数。注意 yaml 的格式,每个配置项后面冒号(:) 跟后面的值之间必须有个空格(' ')。 下面就关键的几个参数补充说明如下:
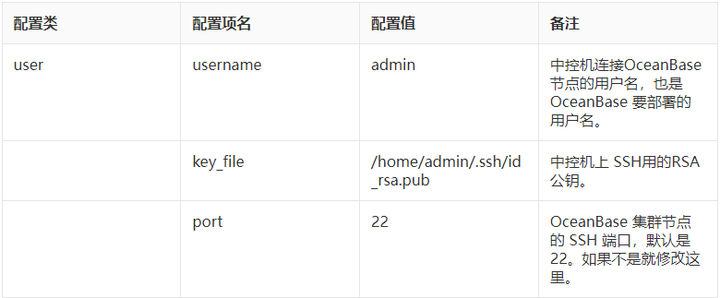
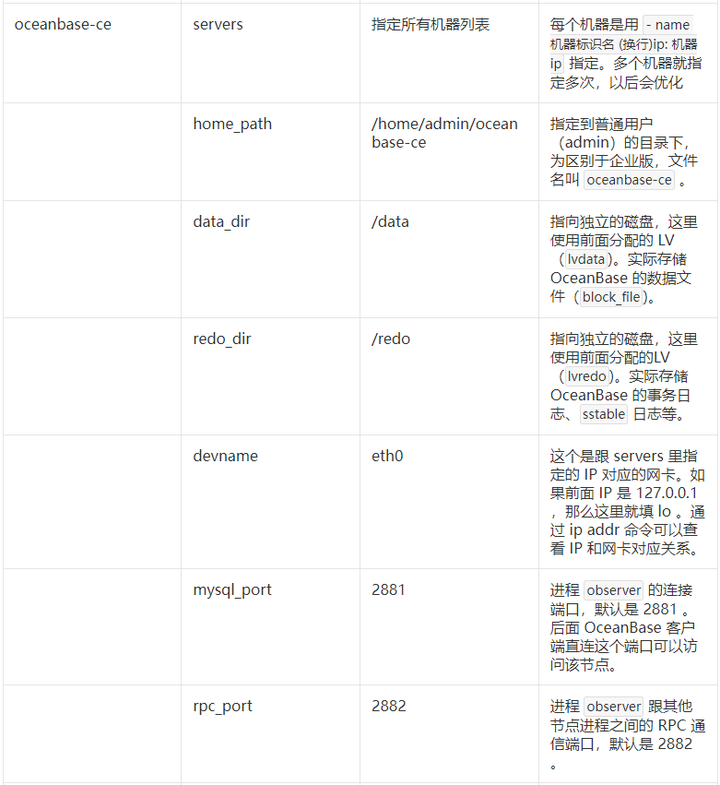
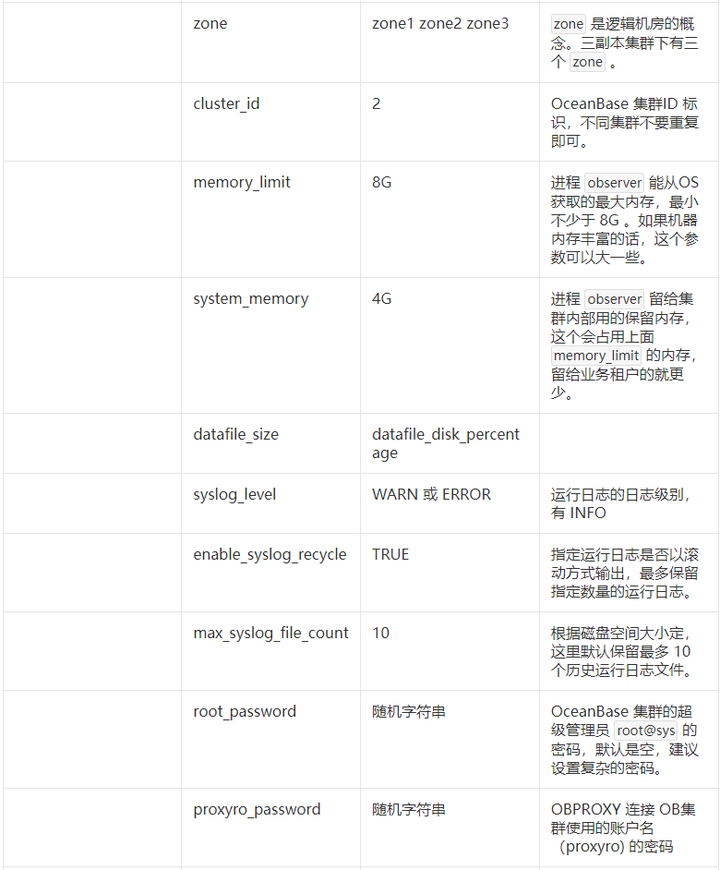
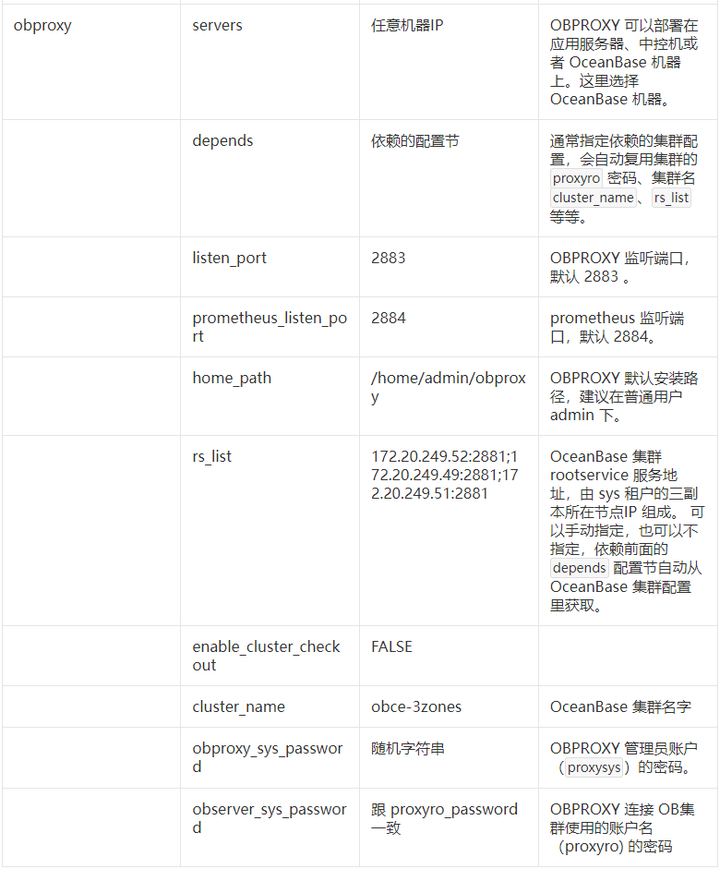
当上面部署成功后,OBD 会把配置文件 obce-3zones.yaml 复制到自己的工作目录里(~/.obd/cluster/obce-3zones/config.yaml ),后期再改外面这个 obce-3zones.yaml 文件,是不生效的。
OBD 部署集群
配置文件准备好后,就可以部署这个配置文件对应的集群了,部署内容主要包含:
- 复制软件到相应节点,并安装软件。
- 在相应节点创建相关目录。
部署使用命令:obd cluster deploy [集群名] -c 集群配置文件
[admin@obce00 ~]$ obd cluster deploy obce-3zones -c obce-3zones.yaml
oceanbase-ce-3.1.0 already installed.
obproxy-3.1.0 already installed.
+-----------------------------------------------------------------------------+
|                                   Packages                                  |
+--------------+---------+---------+------------------------------------------+
| Repository   | Version | Release | Md5                                      |
+--------------+---------+---------+------------------------------------------+
| oceanbase-ce | 3.1.0   | 3.el8   | 84bd2fe27f8b8243cc57d8a3f68b4c50f94aab80 |
| obproxy      | 3.1.0   | 1.el8   | d242ea5fe45222b8f61c3135ba2aaa778c61ea22 |
+--------------+---------+---------+------------------------------------------+
Repository integrity check ok
Parameter check ok
Open ssh connection ok
Remote oceanbase-ce-3.1.0-84bd2fe27f8b8243cc57d8a3f68b4c50f94aab80 repository install ok
Remote oceanbase-ce-3.1.0-84bd2fe27f8b8243cc57d8a3f68b4c50f94aab80 repository lib check ok
Remote obproxy-3.1.0-d242ea5fe45222b8f61c3135ba2aaa778c61ea22 repository install ok
Remote obproxy-3.1.0-d242ea5fe45222b8f61c3135ba2aaa778c61ea22 repository lib check ok
Cluster status check ok
Initializes cluster work home ok
Initializes cluster work home ok
obce-3zones deployed


<p style="margin:0;"></p>
检查集群部署状态。
[admin@obce00 ~]$ obd cluster list
+----------------------------------------------------------------------+
|                             Cluster List                             |
+-------------+--------------------------------------+-----------------+
| Name        | Configuration Path                   | Status (Cached) |
+-------------+--------------------------------------+-----------------+
| obce-3zones | /home/admin/.obd/cluster/obce-3zones | deployed        |
+-------------+--------------------------------------+-----------------+


<p style="margin:0;"></p>
OBD 启动和初始化集群
上面 deploy 操作只是安装了软件和准备初始化目录,还需要启动集群节点并初始化集群,使用 obd cluster start 命令。
obd cluster start obce-3zones

输出:
[admin@obce00 ~]$ obd cluster start obce-3zones
Get local repositories and plugins ok
Open ssh connection ok
Cluster param config check ok
Check before start observer ok
[WARN] (172.20.249.52) The recommended value of fs.aio-max-nr is 1048576 (Current value: 65536)
[WARN] (172.20.249.52) The recommended number of open files is 655350 (Current value: 65535)
[WARN] (172.20.249.49) The recommended value of fs.aio-max-nr is 1048576 (Current value: 65536)
[WARN] (172.20.249.49) The recommended number of open files is 655350 (Current value: 65535)
[WARN] (172.20.249.51) The recommended value of fs.aio-max-nr is 1048576 (Current value: 65536)
[WARN] (172.20.249.51) The recommended number of open files is 655350 (Current value: 65535)

Check before start obproxy ok
Start observer ok
observer program health check ok
Connect to observer ok
Initialize cluster
Cluster bootstrap ok
Wait for observer init ok
+-------------------------------------------------+
|                     observer                    |
+---------------+---------+------+-------+--------+
| ip            | version | port | zone  | status |
+---------------+---------+------+-------+--------+
| 172.20.249.49 | 3.1.0   | 2881 | zone2 | active |
| 172.20.249.51 | 3.1.0   | 2881 | zone3 | active |
| 172.20.249.52 | 3.1.0   | 2881 | zone1 | active |
+---------------+---------+------+-------+--------+

Start obproxy ok
obproxy program health check ok
Connect to obproxy ok
Initialize cluster
+-------------------------------------------------+
|                     obproxy                     |
+---------------+------+-----------------+--------+
| ip            | port | prometheus_port | status |
+---------------+------+-----------------+--------+
| 172.20.249.52 | 2883 | 2884            | active |
| 172.20.249.49 | 2883 | 2884            | active |
| 172.20.249.51 | 2883 | 2884            | active |
+---------------+------+-----------------+--------+
obce-3zones running


<p style="margin:0;"></p>
如果集群节点内核参数和会话限制参数不符合要求,安装会给出提示。 这个命令会在 bootstrap 要几分钟。当可用内存不足 8G 或者日志目录剩余可用空间比例不足 5% 的时候,这个 bootstrap 是很可能会失败的。
接下来进一步确认集群初始化成功。这个步骤是可选的。次学习或生产部署的时候,建议检查一下。
- 首先查看启动后的集群状态。
[admin@obce00 ~]$ obd cluster list
+----------------------------------------------------------------------+
|                             Cluster List                             |
+-------------+--------------------------------------+-----------------+
| Name        | Configuration Path                   | Status (Cached) |
+-------------+--------------------------------------+-----------------+
| obce-3zones | /home/admin/.obd/cluster/obce-3zones | running         |
+-------------+--------------------------------------+-----------------+


<p style="margin:0;"></p>
- 检查 OceanBase 集群各个节点进程信息。
OceanBase 是单进程软件,进程名叫 observer ,可以用下面命令查看这个进程。
IPS="172.20.249.52 172.20.249.49 172.20.249.51"
for ob in $IPS;do echo $ob; ssh $ob "ps -ef | grep observer | grep -v grep "; done

输出:
[admin@obce00 oceanbase-ce]$ for ob in $IPS;do echo $ob; ssh $ob "ps -ef | grep observer | grep -v grep "; done
172.20.249.52
admin       6987       1 69 08:35 ?        01:38:26 /home/admin/oceanbase-ce/bin/observer -r 172.20.249.52:2882:2881;172.20.249.49:2882:2881;172.20.249.51:2882:2881 -o __min_full_resource_pool_memory=268435456,memory_limit=8G,system_memory=3G,stack_size=512K,cpu_count=16,cache_wash_threshold=1G,workers_per_cpu_quota=10,schema_history_expire_time=1d,net_thread_count=4,major_freeze_duty_time=Disable,minor_freeze_times=10,enable_separate_sys_clog=0,enable_merge_by_turn=False,datafile_size=50G,enable_syslog_wf=False,enable_syslog_recycle=True,max_syslog_file_count=10,root_password=0EI5N08d,redo_dir=/redo -z zone1 -p 2881 -P 2882 -n obce-3zones -c 2 -d /data -i eth0 -l WARN
172.20.249.49
admin       7064       1 87 08:35 ?        02:02:59 /home/admin/oceanbase-ce/bin/observer -r 172.20.249.52:2882:2881;172.20.249.49:2882:2881;172.20.249.51:2882:2881 -o __min_full_resource_pool_memory=268435456,memory_limit=8G,system_memory=3G,stack_size=512K,cpu_count=16,cache_wash_threshold=1G,workers_per_cpu_quota=10,schema_history_expire_time=1d,net_thread_count=4,major_freeze_duty_time=Disable,minor_freeze_times=10,enable_separate_sys_clog=0,enable_merge_by_turn=False,datafile_size=50G,enable_syslog_wf=False,enable_syslog_recycle=True,max_syslog_file_count=10,root_password=0EI5N08d,redo_dir=/redo -z zone2 -p 2881 -P 2882 -n obce-3zones -c 2 -d /data -i eth0 -l WARN
172.20.249.51
admin       6920       1 72 08:35 ?        01:42:42 /home/admin/oceanbase-ce/bin/observer -r 172.20.249.52:2882:2881;172.20.249.49:2882:2881;172.20.249.51:2882:2881 -o __min_full_resource_pool_memory=268435456,memory_limit=8G,system_memory=3G,stack_size=512K,cpu_count=16,cache_wash_threshold=1G,workers_per_cpu_quota=10,schema_history_expire_time=1d,net_thread_count=4,major_freeze_duty_time=Disable,minor_freeze_times=10,enable_separate_sys_clog=0,enable_merge_by_turn=False,datafile_size=50G,enable_syslog_wf=False,enable_syslog_recycle=True,max_syslog_file_count=10,root_password=0EI5N08d,redo_dir=/redo -z zone3 -p 2881 -P 2882 -n obce-3zones -c 2 -d /data -i eth0 -l WARN


<p style="margin:0;"></p>
从进程里看,可执行文件是 /home/admin/oceanbase-ce/bin/observer ,实际上它是个软链接。
[admin@obce00 oceanbase-ce]$ ll /home/admin/oceanbase-ce/bin/observer
lrwxrwxrwx 1 admin admin 100 Sep 11 17:16 /home/admin/oceanbase-ce/bin/observer -> /home/admin/.obd/repository/oceanbase-ce/3.1.0/84bd2fe27f8b8243cc57d8a3f68b4c50f94aab80/bin/observer


<p style="margin:0;"></p>
进程启动的时候,通过 -o 指定了很多参数,这些参数都是在前面 OBD 集群部署配置文件里指定的。
- 检查 OceanBase 集群各个节点监听状况。
IPS="172.20.249.52 172.20.249.49 172.20.249.51"
for ob in $IPS;do echo $ob; ssh $ob "netstat -ntlp"; done

输出:
[admin@obce00 ~]$ for ob in $IPS;do echo $ob; ssh $ob "netstat -ntlp"; done
172.20.249.52
(Not all processes could be identified, non-owned process infowill not be shown, you would have to be root to see it all.)
Active Internet connections (only servers)
Proto Recv-Q Send-Q Local Address           Foreign Address         State       PID/Program name
tcp        0      0 0.0.0.0:22              0.0.0.0:*               LISTEN      -
tcp        0      0 0.0.0.0:2881            0.0.0.0:*               LISTEN      6987/observer
tcp        0      0 0.0.0.0:2882            0.0.0.0:*               LISTEN      6987/observer
tcp        0      0 0.0.0.0:2883            0.0.0.0:*               LISTEN      7640/obproxy
tcp        0      0 0.0.0.0:2884            0.0.0.0:*               LISTEN      7640/obproxy
172.20.249.49
(Not all processes could be identified, non-owned process infowill not be shown, you would have to be root to see it all.)
Active Internet connections (only servers)
Proto Recv-Q Send-Q Local Address           Foreign Address         State       PID/Program name
tcp        0      0 0.0.0.0:2881            0.0.0.0:*               LISTEN      7064/observer
tcp        0      0 0.0.0.0:2882            0.0.0.0:*               LISTEN      7064/observer
tcp        0      0 0.0.0.0:2883            0.0.0.0:*               LISTEN      7718/obproxy
tcp        0      0 0.0.0.0:2884            0.0.0.0:*               LISTEN      7718/obproxy
tcp        0      0 0.0.0.0:22              0.0.0.0:*               LISTEN      -
172.20.249.51
(Not all processes could be identified, non-owned process infowill not be shown, you would have to be root to see it all.)
Active Internet connections (only servers)
Proto Recv-Q Send-Q Local Address           Foreign Address         State       PID/Program name
tcp        0      0 0.0.0.0:2881            0.0.0.0:*               LISTEN      6920/observer
tcp        0      0 0.0.0.0:2882            0.0.0.0:*               LISTEN      6920/observer
tcp        0      0 0.0.0.0:2883            0.0.0.0:*               LISTEN      7574/obproxy
tcp        0      0 0.0.0.0:2884            0.0.0.0:*               LISTEN      7574/obproxy
tcp        0      0 0.0.0.0:22              0.0.0.0:*               LISTEN      -


<p style="margin:0;"></p>
连接 OceanBase 集群的内部实例(sys)
传统的 mysql 客户端可以连接 OceanBase 社区版,前提是 mysql 的版本是 5.5/5.6/5.7 。OceanBase 也提供自己的客户端工具 obclient 需要安装使用。 跟传统 MySQL 不一样的地方是 OBPROXY 的连接端口是 2883 , 连接用户名是 :root@sys#集群名 ,密码是前面 OBD 配置文件里指定的。
mysql -h 172.20.249.52 -uroot@sys#obce-3zones -P2883 -p0EI5N08d -c -A oceanbase

输出:
[admin@obce00 ~]$ mysql -h 172.20.249.52 -uroot@sys#obce-3zones -P2883 -p0EI5N08d -c -A oceanbase
Welcome to the MariaDB monitor.  Commands end with ; or \g.
Your MySQL connection id is 4
Server version: 5.6.25 OceanBase 3.1.0 (r3-b20901e8c84d3ea774beeaca963c67d7802e4b4e) (Built Aug 10 2021 08:10:38)

Copyright (c) 2000, 2018, Oracle, MariaDB Corporation Ab and others.

Type 'help;' or '\h' for help. Type '\c' to clear the current input statement.

MySQL [oceanbase]> show databases;
+--------------------+
| Database           |
+--------------------+
| oceanbase          |
| information_schema |
| mysql              |
| SYS                |
| LBACSYS            |
| ORAAUDITOR         |
| test               |
+--------------------+
7 rows in set (0.002 sec)

MySQL [oceanbase]> select a.zone,concat(a.svr_ip,':',a.svr_port) observer, cpu_total, (cpu_total-cpu_assigned) cpu_free, round(mem_total/1024/1024/1024) mem_total_gb, round((mem_total-mem_assigned)/1024/1024/1024) mem_free_gb, usec_to_time(b.last_offline_time) last_offline_time, usec_to_time(b.start_service_time) start_service_time, b.status, usec_to_time(b.stop_time) stop_time, b.build_version
from __all_virtual_server_stat a join __all_server b on (a.svr_ip=b.svr_ip and a.svr_port=b.svr_port)
order by a.zone, a.svr_ip
;

+-------+--------------------+-----------+----------+--------------+-------------+----------------------------+----------------------------+--------+----------------------------+------------------------------------------------------------------------+
| zone  | observer           | cpu_total | cpu_free | mem_total_gb | mem_free_gb | last_offline_time          | start_service_time         | status | stop_time                  | build_version                                                          |
+-------+--------------------+-----------+----------+--------------+-------------+----------------------------+----------------------------+--------+----------------------------+------------------------------------------------------------------------+
| zone1 | 172.20.249.52:2882 |        14 |     11.5 |            5 |           4 | 1970-01-01 08:00:00.000000 | 2021-09-12 08:36:06.357140 | active | 1970-01-01 08:00:00.000000 | 3.1.0_3-b20901e8c84d3ea774beeaca963c67d7802e4b4e(Aug 10 2021 08:10:38) |
| zone2 | 172.20.249.49:2882 |        14 |     11.5 |            5 |           4 | 1970-01-01 08:00:00.000000 | 2021-09-12 08:36:07.605244 | active | 1970-01-01 08:00:00.000000 | 3.1.0_3-b20901e8c84d3ea774beeaca963c67d7802e4b4e(Aug 10 2021 08:10:38) |
| zone3 | 172.20.249.51:2882 |        14 |     11.5 |            5 |           4 | 1970-01-01 08:00:00.000000 | 2021-09-12 08:36:07.631981 | active | 1970-01-01 08:00:00.000000 | 3.1.0_3-b20901e8c84d3ea774beeaca963c67d7802e4b4e(Aug 10 2021 08:10:38) |
+-------+--------------------+-----------+----------+--------------+-------------+----------------------------+----------------------------+--------+----------------------------+------------------------------------------------------------------------+
3 rows in set (0.004 sec)


<p style="margin:0;"></p>
在数据库列表里看到 oceanbase 这个数据库,就表示集群初始化成功。
obclient 安装和使用示例。
sudo rpm -ivh /tmp/obd/obclient-2.0.0-2.el8.x86_64.rpm /tmp/obd/libobclient-2.0.0-2.el8.x86_64.rpm

obclient -h 172.20.249.52 -uroot@sys#obce-3zones -P2883 -p0EI5N08d -c -A oceanbase


<p style="margin:0;"></p>