632
1、引言
在CTR预估中,为了解决稀疏特征的问题,学者们提出了FM模型来建模特征之间的交互关系。但是FM模型只能表达特征之间两两组合之间的关系,无法建模两个特征之间深层次的关系或者说多个特征之间的交互关系,因此学者们通过Deep Network来建模更高阶的特征之间的关系。
因此 FM和深度网络DNN的结合也就成为了CTR预估问题中主流的方法。有关FM和DNN的结合有两种主流的方法,并行结构和串行结构。两种结构的理解以及实现如下表所示:
结构描述常见模型
并行结构FM部分和DNN部分分开计算,只在输出层进行一次融合得到结果DeepFM,DCN,Wide&Deep
串行结构将FM的一次项和二次项结果(或其中之一)作为DNN部分的输入,经DNN得到终结果PNN,NFM,AFM
今天介绍的AFM模型(Attentional Factorization Machine),便是串行结构中一种网络模型。
2、AFM模型介绍
我们首先来回顾一下FM模型,FM模型用n个隐变量来刻画特征之间的交互关系。这里要强调的一点是,n是特征的总数,是one-hot展开之后的,比如有三组特征,两个连续特征,一个离散特征有5个取值,那么n=7而不是n=3.

顺便回顾一下化简过程:

可以看到,不考虑外层的求和,我们可以得到一个K维的向量。
不难发现,在进行预测时,FM会让一个特征固定一个特定的向量,当这个特征与其他特征做交叉时,都是用同样的向量去做计算。这个是很不合理的,因为不同的特征之间的交叉,重要程度是不一样的。如何体现这种重要程度,之前介绍的FFM模型是一个方案。另外,结合了attention机制的AFM模型,也是一种解决方案。
关于什么是attention model?本文不打算详细赘述,我们这里只需要知道的是,attention机制相当于一个加权平均,attention的值就是其中权重,判断不同特征之间交互的重要性。
刚才提到了,attention相等于加权的过程,因此我们的预测公式变为:

圆圈中有个点的符号代表的含义是element-wise product,即:

因此,我们在求和之后得到的是一个K维的向量,还需要跟一个向量p相乘,得到一个具体的数值。
可以看到,AFM的前两部分和FM相同,后面的一项经由如下的网络得到:

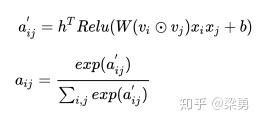
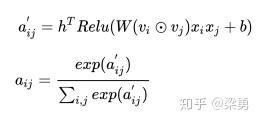
图中的前三部分:sparse iput,embedding layer,pair-wise interaction layer,都和FM是一样的。而后面的两部分,则是AFM的创新所在,也就是我们的Attention net。Attention背后的数学公式如下:

总结一下,不难看出AFM只是在FM的基础上添加了attention的机制,但是实际上,由于后的加权累加,二次项并没有进行更深的网络去学习非线性*交叉特征,所以AFM并没有发挥出DNN的优势,也许结合DNN可以达到更好的结果。
3、代码实现
终于到了激动人心的代码实战环节了,本文的代码有不对的的地方或者改进之处还望大家多多指正。
本文的github地址为:
https://github.com/princewen/tensorflow_practice/tree/master/recommendation/Basic-AFM-Demo
本文的代码根据之前DeepFM的代码进行改进,我们只介绍模型的实现部分,其他数据处理的细节大家可以参考我的github上的代码.
在介绍之前,我们先定义几个维度,方便下面的介绍:
Embedding Size:K
Batch Size:N
Attention Size :A
Field Size (这里是field size 不是feature size!!!!): F
模型输入
模型的输入主要有下面几个部分:
self.feat_index = tf.placeholder(tf.int32,
                                 shape=[None,None],
                                 name='feat_index')
self.feat_value = tf.placeholder(tf.float32,
                               shape=[None,None],
                               name='feat_value')

self.label = tf.placeholder(tf.float32,shape=[None,1],name='label')
self.dropout_keep_deep = tf.placeholder(tf.float32,shape=[None],name='dropout_deep_deep')
feat_index是特征的一个序号,主要用于通过embedding_lookup选择我们的embedding。feat_value是对应的特征值,如果是离散特征的话,就是1,如果不是离散特征的话,就保留原来的特征值。label是实际值。还定义了dropout来防止过拟合。
权重构建
权重主要分以下几部分,偏置项,一次项权重,embeddings,以及Attention部分的权重。除Attention部分的权重如下:
def _initialize_weights(self):
    weights = dict()

    #embeddings
    weights['feature_embeddings'] = tf.Variable(
        tf.random_normal([self.feature_size,self.embedding_size],0.0,0.01),
        name='feature_embeddings')
    weights['feature_bias'] = tf.Variable(tf.random_normal([self.feature_size,1],0.0,1.0),name='feature_bias')
    weights['bias'] = tf.Variable(tf.constant(0.1),name='bias')
Attention部分的权重我们详细介绍一下,这里共有四个部分,分别对应公式中的w,b,h和p。
weights['attention_w'] 的维度为 K * A,
weights['attention_b'] 的维度为 A,
weights['attention_h'] 的维度为 A,
weights['attention_p'] 的维度为 K * 1
# attention part
glorot = np.sqrt(2.0 / (self.attention_size + self.embedding_size))

weights['attention_w'] = tf.Variable(np.random.normal(loc=0,scale=glorot,size=(self.embedding_size,self.attention_size)),
                                     dtype=tf.float32,name='attention_w')

weights['attention_b'] = tf.Variable(np.random.normal(loc=0,scale=glorot,size=(self.attention_size,)),
                                     dtype=tf.float32,name='attention_b')

weights['attention_h'] = tf.Variable(np.random.normal(loc=0,scale=1,size=(self.attention_size,)),
                                     dtype=tf.float32,name='attention_h')


weights['attention_p'] = tf.Variable(np.ones((self.embedding_size,1)),dtype=np.float32)
Embedding Layer
这个部分很简单啦,是根据feat_index选择对应的weights['feature_embeddings']中的embedding值,然后再与对应的feat_value相乘就可以了:
# Embeddings
self.embeddings = tf.nn.embedding_lookup(self.weights['feature_embeddings'],self.feat_index) # N * F * K
feat_value = tf.reshape(self.feat_value,shape=[-1,self.field_size,1])
self.embeddings = tf.multiply(self.embeddings,feat_value) # N * F * K
Attention Net
Attention部分的实现严格按照上面给出的数学公式:

这里我们一步步来实现。
对于得到的embedding向量,我们首先需要两两计算其element-wise-product。即:

通过嵌套循环的方式得到的结果需要通过stack将其变为一个tenser,此时的维度为(F * F - 1 / 2) * N* K,因此我们需要一个转置操作,来得到维度为 N * (F * F - 1 / 2) * K的element-wize-product结果。
element_wise_product_list = []
for i in range(self.field_size):
    for j in range(i+1,self.field_size):
        element_wise_product_list.append(tf.multiply(self.embeddings[:,i,:],self.embeddings[:,j,:])) # None * K

self.element_wise_product = tf.stack(element_wise_product_list) # (F * F - 1 / 2) * None * K
self.element_wise_product = tf.transpose(self.element_wise_product,perm=[1,0,2],name='element_wise_product') # None * (F * F - 1 / 2) *  K
得到了element-wise-product之后,我们接下来计算:

计算之前,我们需要先对element-wise-product进行reshape,将其变为二维的tensor,在计算完之后再变换回三维tensor,此时的维度为 N * (F * F - 1 / 2) * A:
self.attention_wx_plus_b = tf.reshape(tf.add(tf.matmul(tf.reshape(self.element_wise_product,shape=(-1,self.embedding_size)),
                                                       self.weights['attention_w']),
                                             self.weights['attention_b']),
                                      shape=[-1,num_interactions,self.attention_size]) # N * ( F * F - 1 / 2) * A
然后我们计算:

此时的维度为 N * ( F * F - 1 / 2) * 1
self.attention_exp = tf.exp(tf.reduce_sum(tf.multiply(tf.nn.relu(self.attention_wx_plus_b),
                                               self.weights['attention_h']),
                                   axis=2,keep_dims=True)) # N * ( F * F - 1 / 2) * 1
然后计算:

这一层相当于softmax了,不过我们还是用基本的方式写出来:
self.attention_exp_sum = tf.reduce_sum(self.attention_exp,axis=1,keep_dims=True) # N * 1 * 1

self.attention_out = tf.div(self.attention_exp,self.attention_exp_sum,name='attention_out')  # N * ( F * F - 1 / 2) * 1
后,我们计算得到经attention net加权后的二次项结果:

self.attention_x_product = tf.reduce_sum(tf.multiply(self.attention_out,self.element_wise_product),axis=1,name='afm') # N * K

self.attention_part_sum = tf.matmul(self.attention_x_product,self.weights['attention_p']) # N * 1
得到预测输出
为了得到预测输出,除Attention part的输出外,我们还需要两部分,分别是偏置项和一次项:
# first order term
self.y_first_order = tf.nn.embedding_lookup(self.weights['feature_bias'], self.feat_index)
self.y_first_order = tf.reduce_sum(tf.multiply(self.y_first_order, feat_value), 2)

# bias
self.y_bias = self.weights['bias'] * tf.ones_like(self.label)
而我们的终输出如下:
# out
self.out = tf.add_n([tf.reduce_sum(self.y_first_order,axis=1,keep_dims=True),
                     self.attention_part_sum,
                     self.y_bias],name='out_afm')
剩下的代码就不介绍啦!
好啦,本文只是提供一个引子,有关AFM的知识大家可以更多的进行学习呦。
