sersync服务介绍
sersync服务特点
sersync服务原理
sersync环境部署
sersync启动方案
sersync扩展使用
企业数据存储需求
在生产环境中,有部分服务可能会实时更新数据。如果不小心误删了这部分数据,即使做了备份也不会恢复备份之后更新的数据,这就导致新写入的数据丢失
这时可以考虑使用 sersync 数据实时同步服务

sersync服务介绍
1. 什么是实时同步
实时同步是⼀种只要当前⽬录发⽣变化则会触发⼀个事件,事件触发后会将变化的⽬录同步⾄远程服务器
2. 为什么实时同步
保证数据的连续性, 减少⼈⼒维护成本,解决nfs单点故障
3. 实现同步的原理
实时同步需要借助inotify通知接⼝,⽤来监控⽬录的变化,如果监控的⽬录发⽣变更,则触发动作, 这个动作可以是进⾏⼀次同步操作,或其他操作
4. 实时同步⼯具的选择
sersync + rsync、inotify + rsync
Inotify是⼀个通知接⼝,⽤来监控⽂件系统的各种变化,如果⽂件存取,删除,移动。可以⾮常⽅便 地实现⽂件异动告警,增量备份,并针对⽬录或⽂件的变化及时作出响应。rsync + inotify可以做到实 时增量备份
sersync是国⼈基于rsync + inotify-tools开发的⼯具,不仅保留了优点同时还强化了实时监控,⽂件过滤,简化配置等功能,帮助⽤户提⾼运⾏效率,节省时间和⽹络资源。
sersync服务特点
sersync使用C++编写,有对监控的事件过滤的功能
sersync采用xml配置文件,然后由守护进程启动,配置起来比inotify-tools更简单。
使用多线程进行复制,即可以并发复制多个不同文件
sersync自带出错处理机制,通过失败队列对出错的文件重新复制
sersync自带crontab功能,可实现对失败队列中的文件定时整体复制
sersync自带socket与http的协议扩展,可满足有特殊需求的公司进行二次开发
sersync服务原理

sersync主要用于服务器同步,web镜像等功能。基于boost1.43.0,inotify api,rsync command.开发
目前使用的比较多的同步解决方案是inotify-tools+rsync ,另外一个是google开源项目Openduckbill(依赖于inotify- tools),这两个都是基于脚本语言编写的。
针对上图的设计架构,这里做几点说明,来帮助大家阅读和理解该图
-
线程组线程是等待线程队列的守护线程
当事件队列中有事件产生的时候,线程组守护线程就会逐个唤醒同步线程
当队列中 Inotify 事件较多的时候,同步线程就会被全部唤醒一起工作
这样设计的目的是为了能够同时处理多个 Inotify 事件,从而提升服务器的并发同步能力
同步线程的佳数量=核数 x 2 + 2
-
那么之所以称之为线程组线程,是因为每个线程在工作的时候,会根据服务器上新写入文件的数量去建立子线程,子线程可以保证所有的文件与各个服务器同时同步
当要同步的文件较大的时候,这样的设计可以保证每个远程服务器都可以同时获得需要同步的文件
服务线程的作用有三个:
处理同步失败的文件,将这些文件再次同步,对于再次同步失败的文件会生成 rsync_fail_log.sh 脚本,记录失败的事件
每隔10个小时执行 rsync_fail_log.sh 脚本一次,同时清空脚本
crontab功能,可以每隔一定时间,将所有路径整体同步一次
过滤队列的建立是为了过滤短时间内产生的重复的inotify信息,例如在删除文件夹的时候,inotify就会同时产生删除文件夹里的文件与删除文件夹的事件,通过过滤队列,当删除文件夹事件产生的时候,会将之前加入队列的删除文件的事件全部过滤掉,这样只产生一条删除文件夹的事件,从而减轻了同步的负担
同时对于修改文件的操作的时候,会产生临时文件的重复操作。
sersync环境部署
| 安装 rsync
yum install -y rsync inotify-tools
| 检查当前系统是否支持inotify实时监控
通过检查/proc/sys/fs/inotify目录中是否存在以下三个文件
| 安装 rsync
# uname -r
3.10.0-957.1.3.el7.x86_64 #<==内核是3.10,支持inotify机制。
# ls -l /proc/sys/fs/inotify/
total 0
-rw-r--r--. 1 root root 0 Apr 14 18:54 max_queued_events
-rw-r--r--. 1 root root 0 Apr 14 18:54 max_user_instances
-rw-r--r--. 1 root root 0 Apr 14 18:54 max_user_watches
| 在nfs服务器上安装 sersync
# 下载 sersync
wget http://down.whsir.com/downloads/sersync2.5.4_64bit_binary_stable_final.tar.gz
# 安装 sersync
tar xf sersync2.5.4_64bit_binary_stable_final.tar.gz -C /application/
# 改名
mv /application/GNU-Linux-x86 /application/sersync
| 配置sersync
# vim confxml.xml
<inotify>
#监控的动作,true就推送,false就不推送
<delete start="true"/>
<createFolder start="true"/>
<createFile start="true"/>
<closeWrite start="true"/>
<moveFrom start="true"/>
<moveTo start="true"/>
<attrib start="true"/>
<modify start="true"/>
</inotify>
<sersync>
#监控的⽬录
<localpath watch="/backup">
#rsync服务端IP #模块名字
<remote ip="10.0.0.51" name="backup"/>
</localpath>
<rsync>
#rsync推送时的参数
<commonParams params="-az"/>
#rsync推送时认证 #认证的虚拟⽤户 #虚拟⽤户对应的密码⽂件
<auth start="true" users="rsync_backup" passwordfile="/etc/rsync.password"/>
#如果rsync不使⽤默认的873端⼝,使⽤改参数指定
<userDefinedPort start="false" port="874"/><!-- port=874 -->
#超时时间
<timeout start="false" time="100"/><!-- timeout=100 --> <ssh start="false"/>
</rsync>
#错误⽇志保存路径
<failLog path="/tmp/rsync_fail_log.sh" timeToExecute="60"/><!-- default every 60mins execute once-->
#定时任务,设置多久进⾏⼀次全量备份
<crontab start="false" schedule="600"><!--600mins-->
<crontabfilter start="false">
<exclude expression="*.php"></exclude>
<exclude expression="info/*"></exclude>
</crontabfilter>
</crontab>
<plugin start="false" name="command"/>
</sersync>
| 在nfs服务器上创建密码文件
echo "123" > /etc/rsync.password
chmod 600 /etc/rsync.password
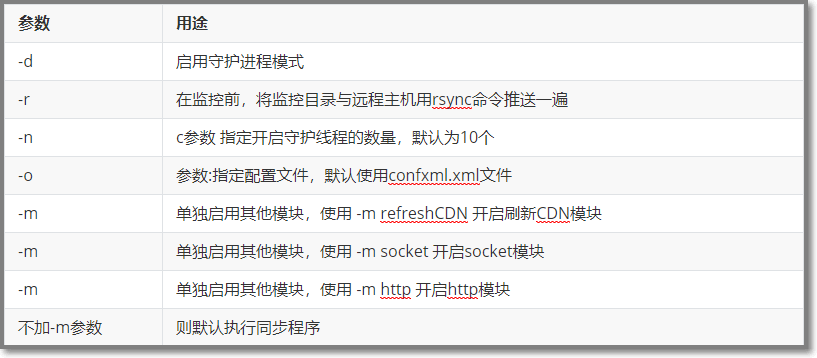
| sersync相关参数

| 启动sersync
/application/sersync/sersync2 -dro /application/sersync/confxml.xml
sersync启动方案
# vim /etc/rc.d/init.d/sersync
#!/bin/bash
# chkconfig: 2345 21 81
# description: rsync service start and stop scripts
# Author: oldboy
# Organization: www.oldboyedu.com
start(){
/application/sersync/sersync2 -d -o /application/sersync/confxml.xml &>/dev/null
}#<--这里是原先的启动命令
stop(){
killall sersync2 2>/dev/null
}
case "$1" in
start)
start
;;
stop)
stop
;;
restart)
stop
sleep 2
start
;;
*)
echo $"Usage:$0 {start|stop|restart}"
exit 1
esac
chmod +x /etc/rc.d/init.d/sersync
#练习脚本启动:
/etc/init.d/sersync stop
ps -ef|grep sync
/etc/init.d/sersync start
ps -ef|grep sync
#这里是用systemctl命令执行sersync命令的配置文件
# cat /usr/lib/systemd/system/sersync.service
[Unit]
Description=sersyncd service
After=network.target
[Service]
Type=forking
ExecStart=/etc/rc.d/init.d/sersync start
ExecReload=/etc/rc.d/init.d/sersync restart
ExecStop=/etc/rc.d/init.d/sersync stop
PrivateTmp=true
[Install]
WantedBy=multi-user.target
chmod +x /usr/lib/systemd/system/sersync.service
sersync扩展使用
| rsync配置多模块
# 在backup备份服务器上操作
# vim /etc/rsyncd.conf
uid = rsync
gid = rsync
port = 873
fake super = yes
use chroot = no
max connections = 200 timeout = 600
ignore errors read only = false list = true
auth users = rsync_backup secrets file = /etc/rsync.passwd
[backup]
comment = 我是⽂件共享⽬录
path = /backup
[data]
comment = 我是⽂件共享⽬录
path = /data
| rsync配置多模块不同虚拟用户
# vim /etc/rsyncd.conf
uid = rsync
gid = rsync
port = 873
fake super = yes
use chroot = no
max connections = 200 timeout = 600
ignore errors read only = false list = true
auth users = rsync_backup secrets file = /etc/rsync.passwd
[backup]
comment = 我是⽂件共享⽬录
path = /backup
auth users = rsync_backup
[data]
comment = 我是⽂件共享⽬录
path = /data
auth users = rsync_data
# 在nfs服务器上
# cat /etc/rsync.passwd
rsync_backup:123456
rsync_data:123456
总结
感谢您的阅读,由于文档整理较费时费力,难免会有疏漏和不妥当地方,敬请谅解。
原文链接:https://mp.weixin.qq.com/s/2P1wUnxmLBP3ZPwoHET2Mw


