虽然Trino官方给出了单机测试环境中,模拟运行三个Trino节点的代码,即通过testing模块中的DistributedQueryRunner 类,模拟了三个节点,一个作为coordinator,另外两个作为worker。但是这毕竟跑的是test的代码,而非正在部署时的代码,所运行的server也不是部署时的server,而是模拟运行的TestingTrinoServer,并且,倘若想要扩充节点,或者测试更加复杂的真实环境中场景,这种依靠testing模块的方式显然不太可靠。
可以利用docker容器技术实现环境隔离,通过容器集群模拟真实的机器集群。
容器集群规划
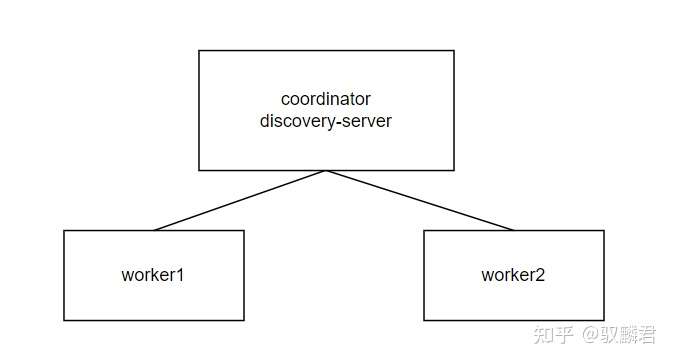
利用docker容器集群模拟真实的机器集群,理论上可以增加任意节点,这里还是以三节点为例,参考三节点的配置方式,可以轻松部署任意节点的容器集群。容器集群仍旧规划为一个coordinator节点,两个worker节点。节点发现服务采用Trino内置的节点发现服务,节点发现服务部署在coordinator上。
各节点的Dockerfile编写
在编写Dockerfile的时候要注意两个点:
- trino-server的部署压缩包的名称应该设置成一个变量,以方便后续的升级
- coordinator和worker使用不同的配置文件,所以在这两类node中,配置文件应该挂载在不同的宿主机目录上,宿主机的两个目录分别放置coordinator和worker的配置文件
考虑到以上两点,Dockerfile也就如下所示了:
FROM centos:centos8

RUN echo "trino soft nofile 131072" >> /etc/security/limits.d/trino.conf && \
    echo "trino hard nofile 131072" >> /etc/security/limits.d/trino.conf

RUN yum makecache && \
    yum install -y python3 && \
    yum install -y java-11-openjdk-devel && \
    ln -s /usr/bin/python3 /usr/bin/python

ENV JAVA_HOME=/usr/lib/jvm/java-11-openjdk
ENV PATH=$PATH:${JAVA_HOME}/bin

# must give the name of trino server package
ARG TRINO_SERVER_PACKAGE
ADD ${TRINO_SERVER_PACKAGE}.tar.gz /
RUN ln -s /${TRINO_SERVER_PACKAGE} /trino

# must mount /trino-etc when docker run
ENTRYPOINT ["/trino/bin/launcher", "--etc-dir=/trino-etc", "run"]
可以看到,这个Dockerfile中,定义了变量 TRINO_SERVER_PACKAGE ,用以指示trino-server部署包的名称。在容器运行命令中,通过 --etc-dir 指定容器中配置文件的位置为 /trino-etc ,而容器中 /trino-etc 目录会根据该容器代表的节点是coordinator还是worker,指向宿主机的不同目录。
容器集群配置和编排
docker-compose.yml 指示了docker容器是怎么编排的,利用docker-compose命令读取docker-compose.yml文件,启动整个容器集群。不过docker-compose只用于单机容器的编排。要是想要多机的容器编排,还是要依靠swarm或者k8s。
在各个节点的Dockerfile中,遗留了两样东西,需要在docker-compose.yml中指明,一是trino-server的部署包,二是trino的配置文件。
trino配置
trino的配置文件分为coordinator的配置文件,以及worker的配置文件。配置文件有以下内容:
- 服务端配置——etc/config.properties
- 日志配置——etc/log.properties
- 节点配置——etc/node.properties
- jvm配置——etc/jvm.config
下面给出coordinator的配置,由于使用容器集群模拟机器集群,所以可以认为各节点持有的资源是相同的,所以,worker相对coordinator的配置,仅仅删除etc/config.properties中的节点发现服务,并把服务类型改为coordinator=false即可。其余配置,worker与coordinator完全相同。
- config.properties
coordinator=true
node-scheduler.include-coordinator=true
http-server.http.port=8080
query.max-memory=5GB
query.max-memory-per-node=1GB
query.max-total-memory-per-node=2GB
discovery-server.enabled=true
discovery.uri=http://coordinator:8080- log.properties
io.trino=INFO- node.properties
node.environment=demo- jvm.config
-server
-Xmx4G
-XX:+UseG1GC
-XX:G1HeapRegionSize=32M
-XX:+ExplicitGCInvokesConcurrent
-XX:+ExitOnOutOfMemoryError
-XX:+HeapDumpOnOutOfMemoryError
-XX:-OmitStackTraceInFastThrow
-XX:ReservedCodeCacheSize=512M
-XX:PerMethodRecompilationCutoff=10000
-XX:PerBytecodeRecompilationCutoff=10000
-Djdk.attach.allowAttachSelf=true
-Djdk.nio.maxCachedBufferSize=2000000
trino容器编排
trino容器集群的编排依靠docker-compose.yml文件。
version: "3.9"
services:
    coodinator:
        build:
            context: ./
            args:
                TRINO_SERVER_PACKAGE: trino-server-364
        volumes:
          - ./coordinator-etc:/trino-etc
        networks:
          - trino-net
        hostname: coordinator
        ports:
          - "8080:8080"
    worker1:
        build:
            context: ./
            args:
                TRINO_SERVER_PACKAGE: trino-server-364
        volumes:
          - ./worker-etc:/trino-etc
        networks:
          - trino-net
    worker2:
        build:
            context: ./
            args:
                TRINO_SERVER_PACKAGE: trino-server-364
        volumes:
          - ./worker-etc:/trino-etc
        networks:
          - trino-net

networks:
    trino-net:
        driver: bridge
可以看到,trino容器集群使用了同一个名为trino-net的网络,实现了网络互通,然后使用了名为 trino-server-364 的部署包。coordinator的配置文件存放在主机的coordinator-etc目录下,并挂载到容器的/trino-etc路径;worker的配置文件存放在主机的worker-etc目录下,并挂载到容器的/trino-etc路径。

由于在节点发现服务的配置中使用了hostname,所以需要在docker-compose.yml中指明
容器集群运行
当一切准备就绪的时候,运行命令docker-compose up ,就能看到三个trino容器都启动了 。


现在访问8080端口,可以看到trino容器集群的信息:
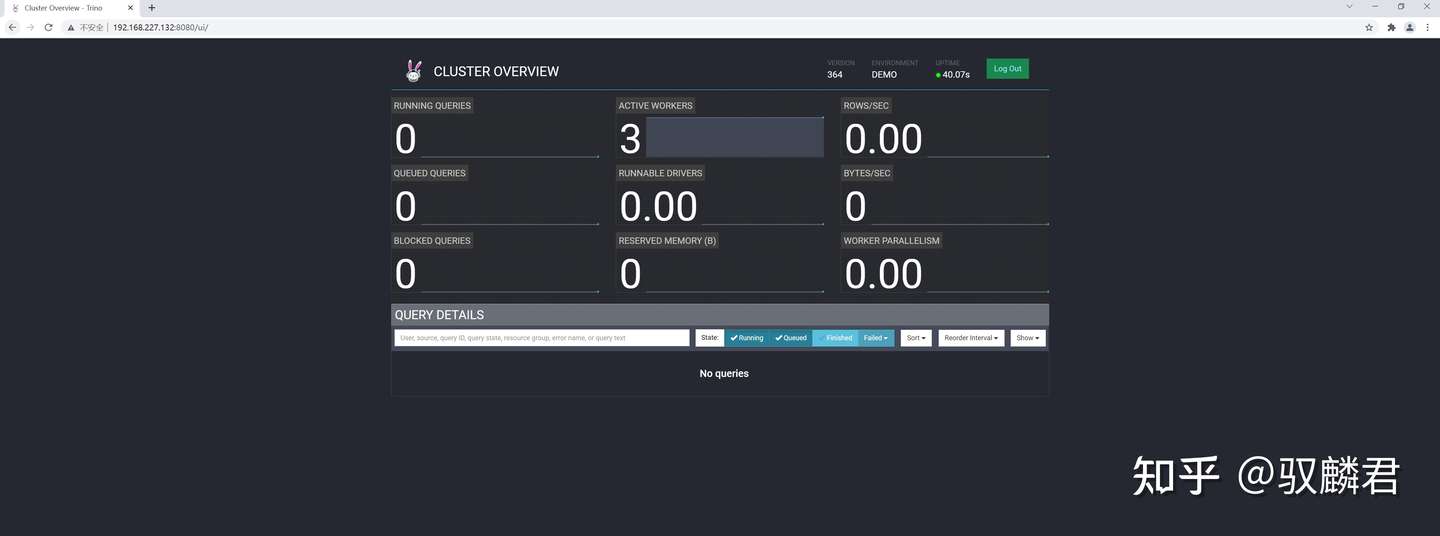
可以看到,trino容器集群的三个节点都启动了。假如只能看到一个节点,那么就要检查以下节点发现服务,或者node.properties中的node.environment是否设置成同一值(node.environment的值相同表示同一个集群)。
2022年1月7日更新
由于各个容器的镜像都是相同的,没有必要创建多个同名镜像,所以改为单镜像模式。Dockerfile内容不变,使用命令docker build -t trino --build-arg TRINO_SERVER_PACKAGE=trino-server-xxx .创建镜像,docker-compose.yml改为如下内容:
version: "3.9"
services:
    coodinator:
        image: trino:latest
        volumes:
          - ./coordinator-etc:/trino-etc
        networks:
          - trino-net
        hostname: coordinator
        ports:
          - "8080:8080"
    worker1:
        image: trino:latest
        volumes:
          - ./worker-etc:/trino-etc
        networks:
          - trino-net
    worker2:
        image: trino:latest
        volumes:
          - ./worker-etc:/trino-etc
        networks:
          - trino-net

networks:
    trino-net:
        driver: bridge
本项目的代码: